Economics of Hosting Open Source LLMs
Large Language Models in Production
Leveraging various deployment options
If you’re not a member but want to read this article, see this friend link here.
If you’ve been experimenting with open-source models of different sizes, you’re probably asking yourself: what’s the most efficient way to deploy them?
What’s the pricing difference between on-demand and serverless providers, and is it really worth dealing with a player like AWS when there are LLM serving platforms?
I’ve decided to dive into this subject, comparing cloud vendors like AWS with newer alternatives like Modal, BentoML, Replicate, Hugging Face Endpoints, and Beam.
We’ll look at metrics such as processing time, cold start delays, and CPU, memory, and GPU costs to understand what’s most efficient and economical. We’ll also cover softer metrics like ease of deployment, developer experience and community.

We’ll explore a few use cases, such as deploying a smaller model on CPU versus running a 7–8 billion parameter model on GPU.
I’ll also dig into the process of deploying a smaller model on AWS Lambda with EFS and compare it against a more modern platform like Modal.
I won’t dive into optimization strategies here — things like speeding up inference with different frameworks or quantization — that’s a separate topic altogether.
Instead, this article will focus on how to choose the right deployment option, give you a chance to compare performance across different scenarios, and help you understand the economic costs of deploying both small and large LLMs.
Introduction
When you’re using off-the-shelf open-source models, there are plenty of API options that are easy to tap into. I recommend checking out the this list for a few choices. You can also choose to self-host — take a look at the ‘Local Inference’ section in the same list.
However, you may need to use private, fine-tuned, or less common models.
You could of course host these locally as well, but you’ll need enough juice on your computer, plus you might want to integrate these models into an application running on another server.
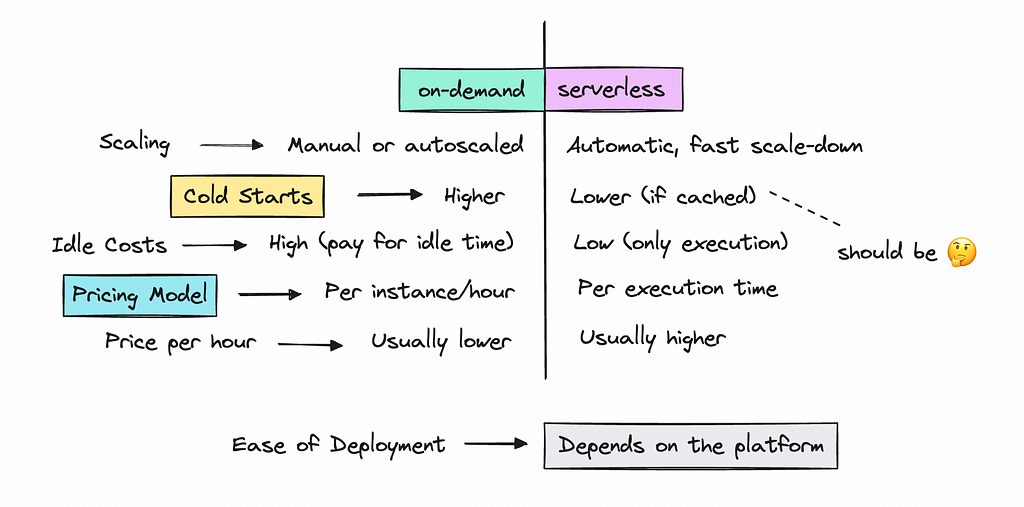
This brings us to hosting open-source models on-demand or via serverless platforms. The idea is that you only pay for the resources you use, whether it’s on-demand or per run, as with serverless.
Serverless and on-demand work a bit the same, but with serverless, the scaling down happens faster, so you don’t pay for idle resources.
You can look at my scribbles below for more of a comparison.
In this article, we’ll compare pricing for AWS’s EC2 and Lambda with several emerging platforms that have recently gained popularity.
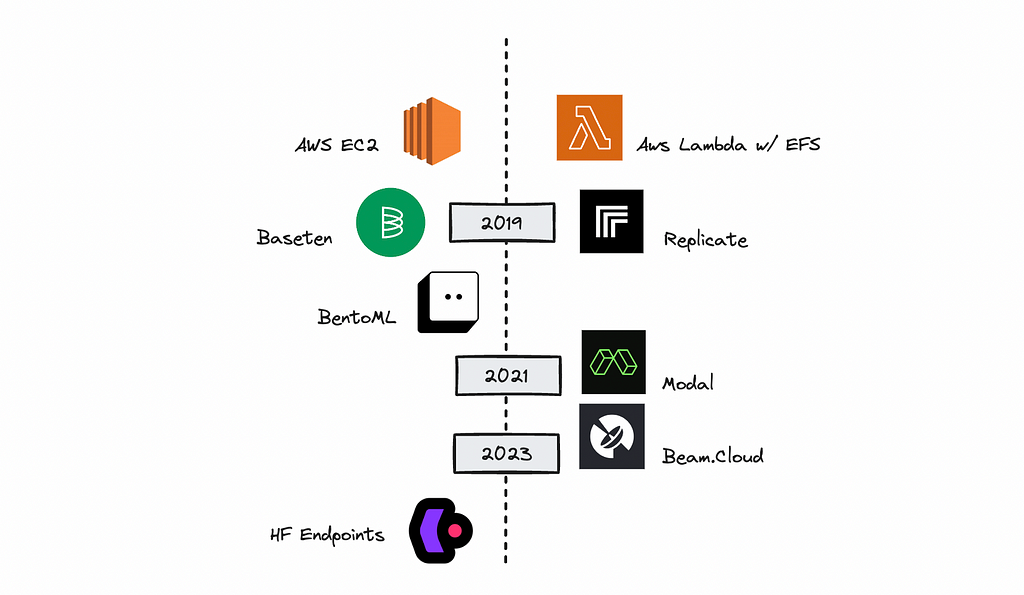
This way, you’ll get a better sense of what might work best.
As a side note, I have not been paid by any of these vendors, so the information I share here is my own.
If you’re a stakeholder, this is a great way to understand the economics of the different options and what it might cost to run inference based on model size and vendor choice.
The first part of the article covers the research, which anyone can follow along with, while the second part goes into the technical aspects of deployment that you may or may not want to read.
LLM Serving Frameworks
Now, before we get started, I want to comment a bit on LLM inference frameworks, which simplify the setup of API endpoints to serve models. There are several open-source LLM serving frameworks available, including vLLM, TensorRT, and TGI, which we can use here.
You can check out some of the more popular ones in the ‘LLM Serving Frameworks’ section of the list I shared earlier (seen below).
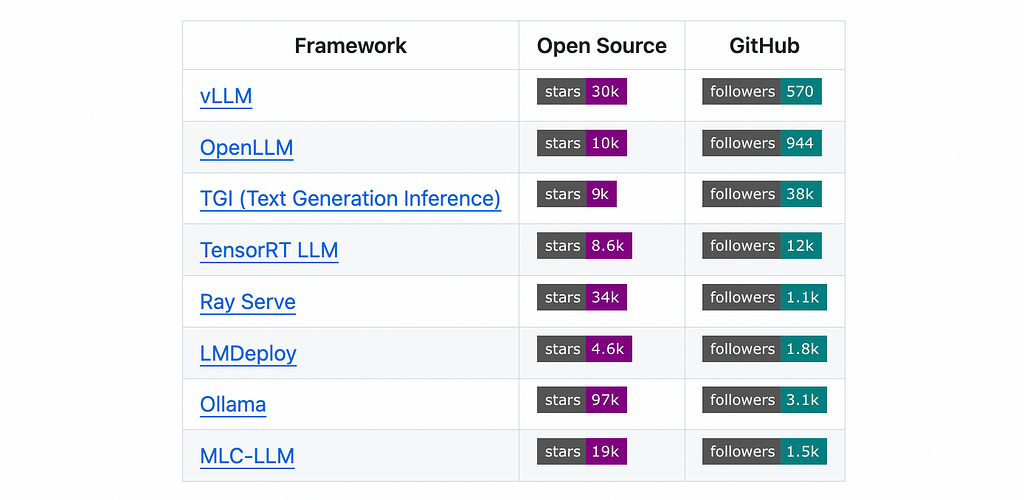
Some have measured the performance differences between these frameworks, and you should definitely do your own research.
In this article, though, we’ll use vLLM, which is widely used — except when deploying a model via Hugging Face Endpoints, which will automatically use TGI for us.
To deploy a smaller transformer model running on CPU, I simply used the Hugging Face pipeline or the transformers library directly.
The Research
In this first part, we’ll look at the efficiency, cost, and performance of our choices, both on-demand and serverless. We’ll start by going through the metrics before diving into any technical details.
Processing Time
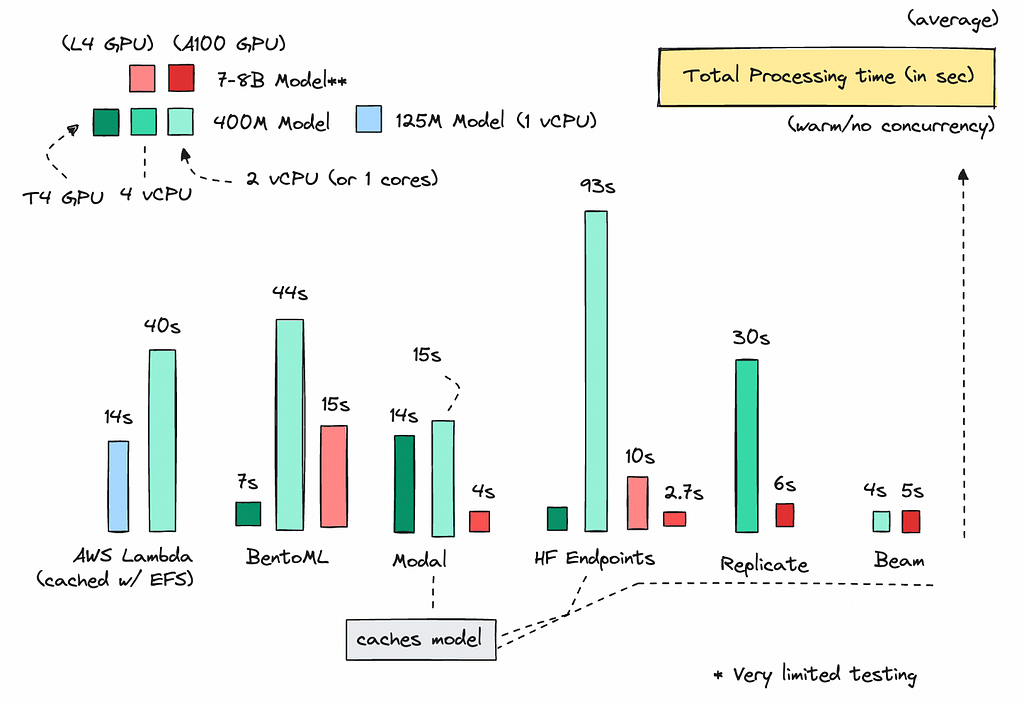
Let’s begin by measuring the total processing time across the platforms when the container is warm (i.e., it’s been used within the last few seconds) with no concurrency.
We define processing time as the total time taken to complete the response. Note that some might measure time to first response, especially when streaming the output.
For consistency, I used the same prompts for each test. For the 400M model, I batched the texts by 30.
You can see the metrics below.
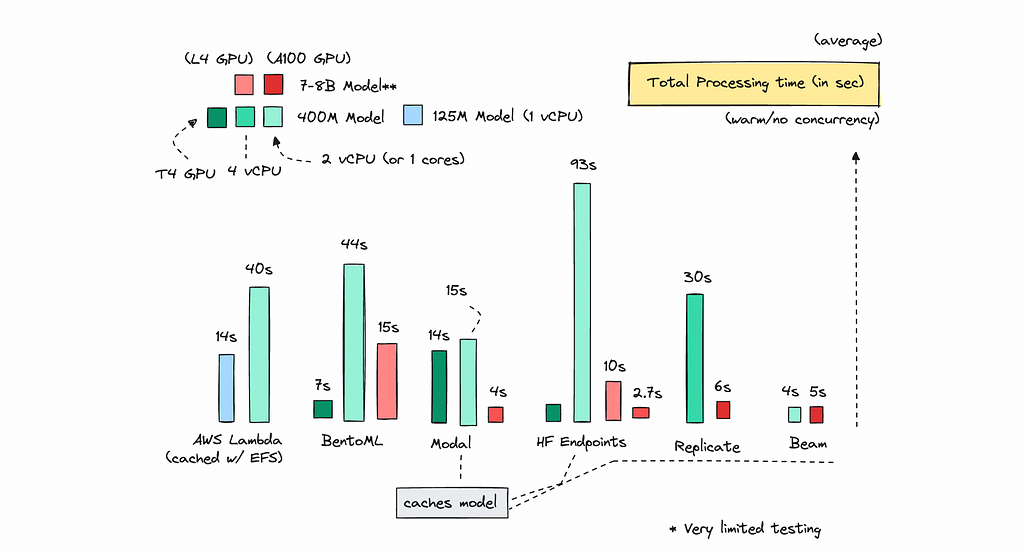
I only ran these tests a few times per platform on the same day. Ideally, I should have tested them over several days. I may have been unlucky for some of them.
But to discuss how they did, for the Serverless providers, Modal and Beam, perform really well on CPU (shown as the light green bars).
I found that using smaller models (under 130M) works great with AWS Lambda, especially if you cache your models using EFS.
While I really like Hugging Face Endpoints, I find their CPU instances to be a bit unpredictable. However, their AWS GPU instances are quite reliable and really fast.
We get very fast responses on GPU with Hugging Face, even hosting a 7B model on an L4 instance returns a response in about 10 seconds — something we can’t achieve with the serverless providers, which need more GPU power.
Of course, speed is great, but we also need to consider other metrics.
Cold Boots
Next, let’s dive into cold boots, i.e. how long it takes for a model to respond if it hasn’t been used for a while. Even if you cache a model, it may still need to download shards, which can add a few seconds.
On-demand services may allow you to cache models for faster boot times, which I didn’t do here, but most serverless providers show you how to cache during build time, which can reduce cold boot latency.
Let’s look at the metrics across a few platforms below.
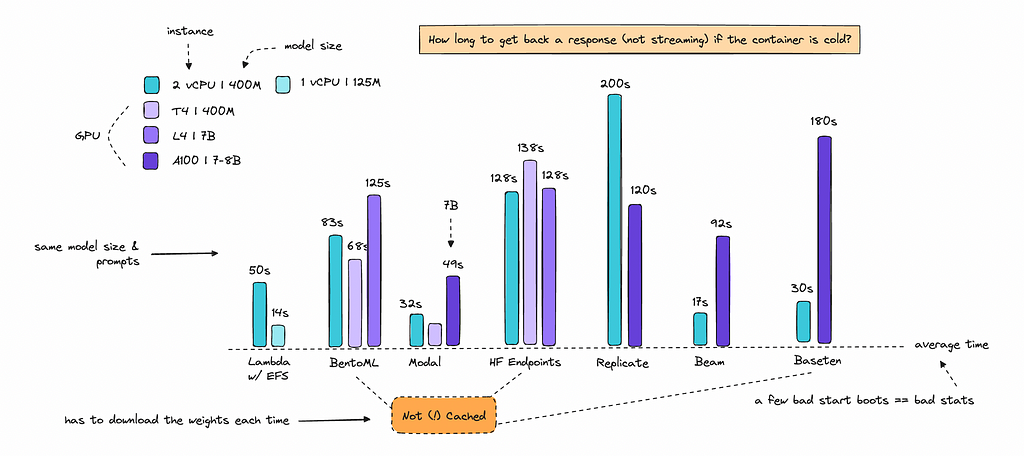
Note, I calculated the entire processing time when cold, be sure to check the calculations directly for only the cold boots.
As expected, on-demand services where I didn’t cache the models, perform worse, such as BentoML, Hugging Face Endpoints, and Baseten.
While Hugging Face Endpoints can perform well once they’re running, you can still encounter cold boots lasting from 30 seconds to up to 5 minutes, which can be problematic if you need to scale up and down often. They will also throw 500 errors until the container is fully running again.
Serverless providers are faster as they are designed to scale quickly by asking us to cache the model weights when we first deploy.
On CPU, Beam performed the best, followed by Baseten, Modal, and Lambda with EFS. Smaller models are generally faster to boot up. Using Lambda for a small model with only 125M parameters showed great results, with quick processing times and minimal cold boot delays.
Although I would argue that using Modal or Beam for a smaller model would do fine as well.
GPU & CPU Pricing
Let’s turn to pricing. We need to look at the costs for CPU, memory, and GPU resources.
There are noticeable differences between the platforms. Serverless providers are generally more expensive since they also charge for CPU and memory on top of GPU usage. However, they don’t bill you for idle time, which can help offset the higher costs.
You can find the pricing for Nvidia GPUs in the image below.
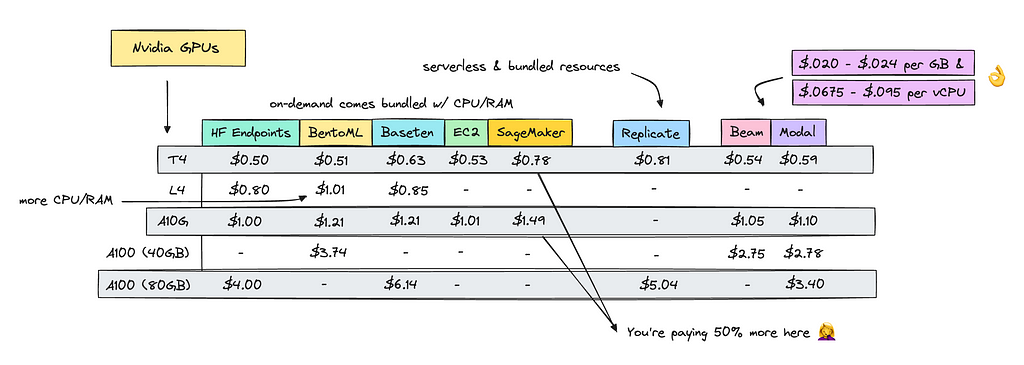
You should though take a look at SageMaker, that has the highest GPU cost across all of these. If you need to use AWS it may be better to use EC2 directly.
Let’s also look at CPU pricing.
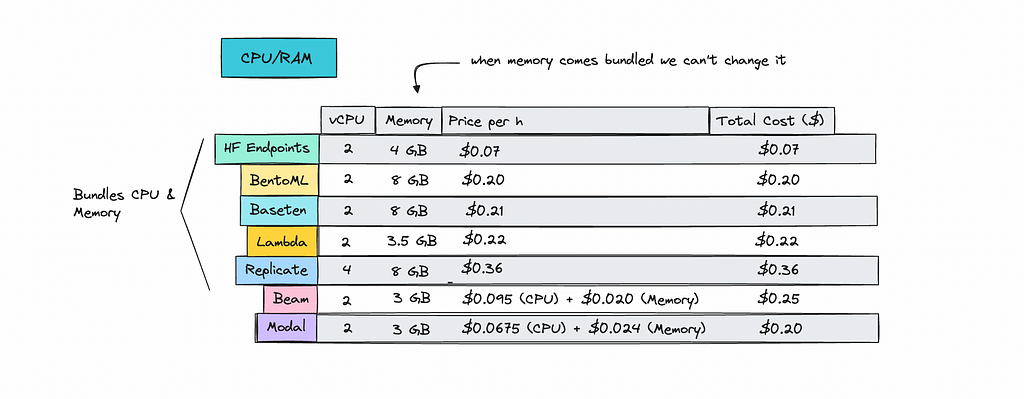
Hugging Face Endpoints leads with a cost of $0.07 for an instance with 2 vCPU and 4GB of memory, it’s too bad it just doesn’t perform that well.
Beam and Modal allow you to tweak the resources needed, which helps minimize costs. For a 400M model, I calculated that I only needed 3GB of memory and 1 core (2 vCPU) on both platforms.
On the other hand, Replicate forces us to use 4 vCPU regardless of the model size, making it the most expensive option here.
We’ll go through a few use cases to compare pricing and efficiency across all these platforms.
Case 1: Fine-Tuned 400M Model running on CPU
The first case will be running a 400M model sporadically throughout the day. This means the container needs to scale up and down each time it’s called.
This may not always be the case, but we’ll have to calculate it as if it is.
I ran this case study by batching 30 texts for each call with a smaller fine-tuned model, making 250 calls throughout the day. For simplicity, we’ll assume that the container is cold each time it runs (except for Hugging Face Endpoints).
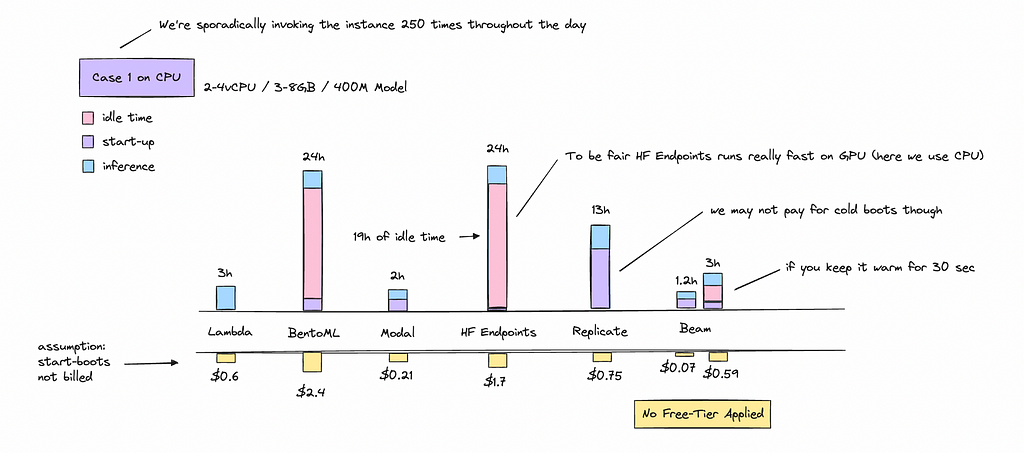
The serverless providers are much cheaper here as we don’t pay for idle time in the same way as for on-demand. For BentoML we need to keep it idle for at least 5 minutes before it autoscales down, and for HF endpoints we have to wait 15 minutes.
As HF endpoints will take at least 15 minutes to scale down, if we call the function every 5–6 minutes it won’t have time to scale down thus we have very low start boots but a majority of idle time.
We can see that doing something like this is inherently inefficient if we are renting an instance on-demand. We will pay a majority of money to idle resources throughout the day.
A cent or a dollar here and there might not seem like much for your first few days but after awhile it adds up.
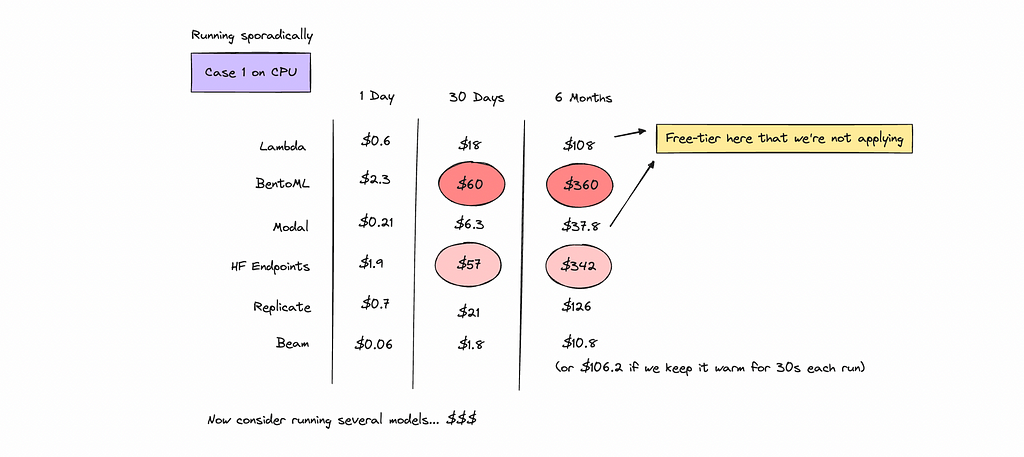
Just think of it like people saving a bit of money each day in their savings account — overpaying here would be the reverse of that.
But what if we ran all 250 calls while the container is warm? How much would the cost differ?
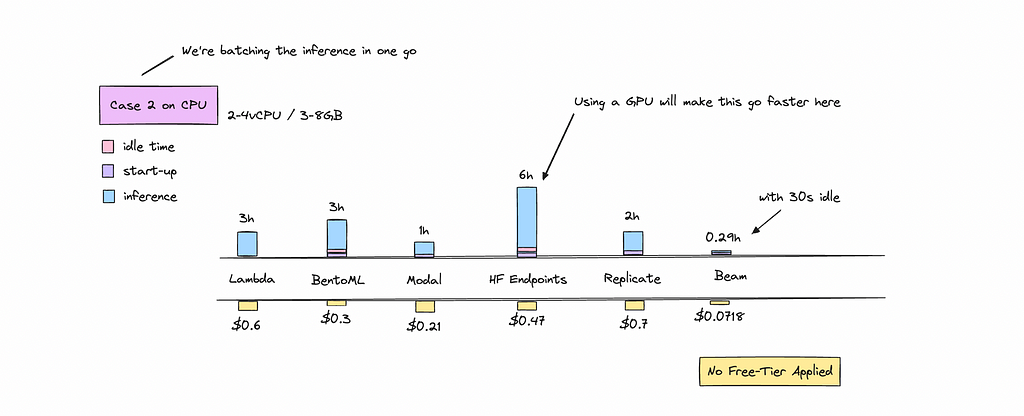
Beam seems to be an outlier here but I think they are running over max CPU that the other platforms aren’t allowing you to do.
In this scenario, cold boots and idle time disappear. This shows that using a persistent container is the better choice if you’re processing everything in one go — it’s a lot cheaper.
It’s worth noting that a 400M model is best suited for a T4 GPU on both Hugging Face Endpoints and BentoML. This setup keeps costs low while significantly reducing processing time.
One thing to keep in mind: if you use AWS Lambda with EFS, you’ll incur an additional cost for a NAT Gateway, which can add $1 to $3 per day, increasing the overall cost more than is shown here.
Now, let’s move on to the second case — running a larger model with 7B to 8B parameters on GPU.
Case 2: General 8B Model running on GPU
For this case, I’ve been testing models like Mistral, Gemma, or Llama with sizes around 7B — 8B.
The scenario involves sporadically invoking the model 250 times throughout the day. We assume the container scales up and down for each invocation, even though this might not always be the case.
Just like with the CPU tests, the on-demand services we assume to be running for 24 hours as it doesn’t have time to scale down.
I have made sure to write out the GPU instance we’ve used here for each vendor. Look at the bar chart below.
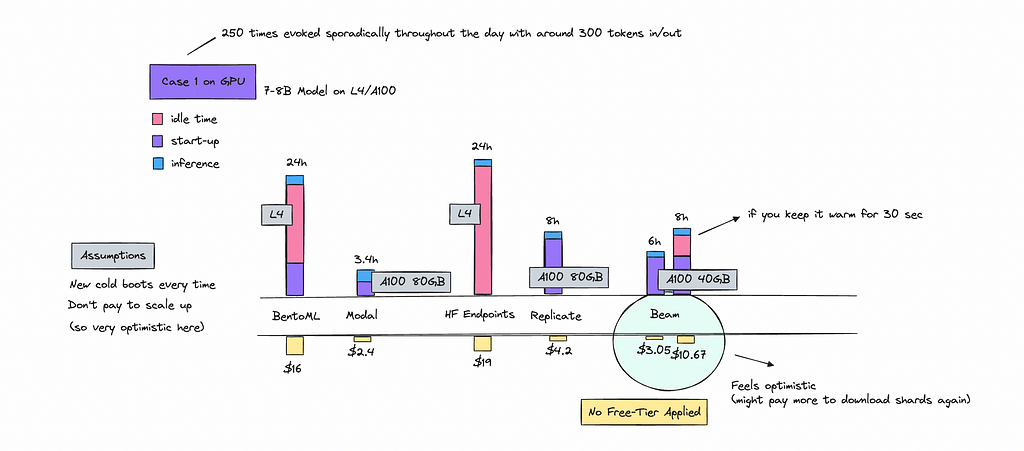
For the serverless providers, I’ve slightly inflated the processing time by multiplying it but excluded cold boots from the total price calculation.
While the actual cost might be lower, this adjustment is to be cautious. There is a chance you’ll be billed more as you will pay for some of the start boots.
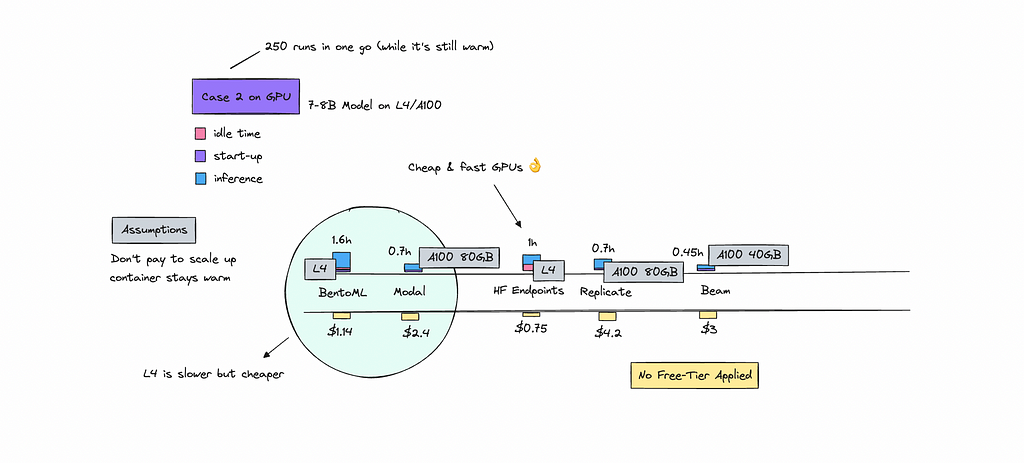
Just as we saw on the CPU case, running the 250 calls in one go is more cost effective.
If you would setup calculations for let’s say Anthropic’s and OpenAI’s cheapest models and compared them to the cost of self-hosting, you will see that you are paying significantly less to call their models with the same prompt than if you would host it like this.
People call these vendors the McDonald’s of LLMs.
We think that open source will be cheaper but we don’t calculate the actual unit economics of hosting. These platforms are also subsidized by VC funding. However, like I mentioned before there are cheaper ways to access open source models using vendors you’ll find here.
If you want to dig into the detailed calculations, you can check out this file. Fair warning — it looks a bit messy.
User Experience
By now, you may have reached your own conclusions, but one last thing I want to cover is user experience.
If you are a non-coder then HF Endpoints is very easy to work with, as you can simply click to deploy a model from the HuggingFace hub. If you are a bit technical you may prefer other options where you have more control.
For Replicate, they have a large follower base and a lot of public models shared by various people. There is community around it. They have a few one-click train and deploy processes that make it easier.
However, I found Modal, Beam and BentoML to be a great developer experience in general. You deploy directly via the terminal and let the code run on their servers.
With Replicate, if you are deploying your own models, you’ll need a GPU machine and with Baseten you need to download a library called Truss, which takes a bit of time.
I have collected some of my notes in this table (also seen below).
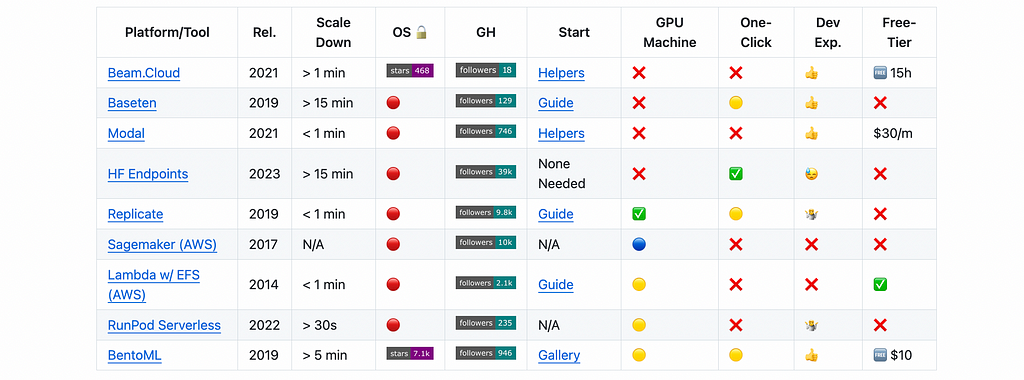
The table will have links to get started scripts as well if you’re keen to work with any of these.
Now that we’ve covered most of the non-technical aspects, I’ll walk you through two deployment options for a model that performs well on CPU, AWS Lambda and Modal.
Technical Bits
In this section, we’ll go through deploying a 400M model that I’ve fine-tuned for keyword extraction using AWS Lambda with EFS, and compare it to a deployment on a newer platform like Modal.
Both tools are serverless, which means we need to cache the model properly at build time so we can quickly access it on consecutive runs. AWS provides a ready-made script that we can easily tweak, and I’ve also prepared a script for Modal here.
We’ll focus on two main things: how to deploy the model on each platform and reflecting on the key differences in the deployment process.
Deployment to Lambda w/ EFS
For this part, you can read it through or follow along to deploy.
To follow along you will need git, AWS CDK, Docker, NodeJS 18+, Python 3.9+ installed on your computer. Once you have all of these installed you can open up a new terminal.
Create a new directory if you want to and then clone the repository below.
git clone https://github.com/aws-samples/zero-administration-inference-with-aws-lambda-for-hugging-face.git
Go into the directory that has been created.
cd zero-administration-inference-with-aws-lambda-for-hugging-face
You can now open up the files in your code editor.
I use VSCode so I simply do like so.
.code
Now we can go into the files that have been created and tweak them a bit. Look into the Inference folder where you will see two files, sentiment.py and summarization.py.
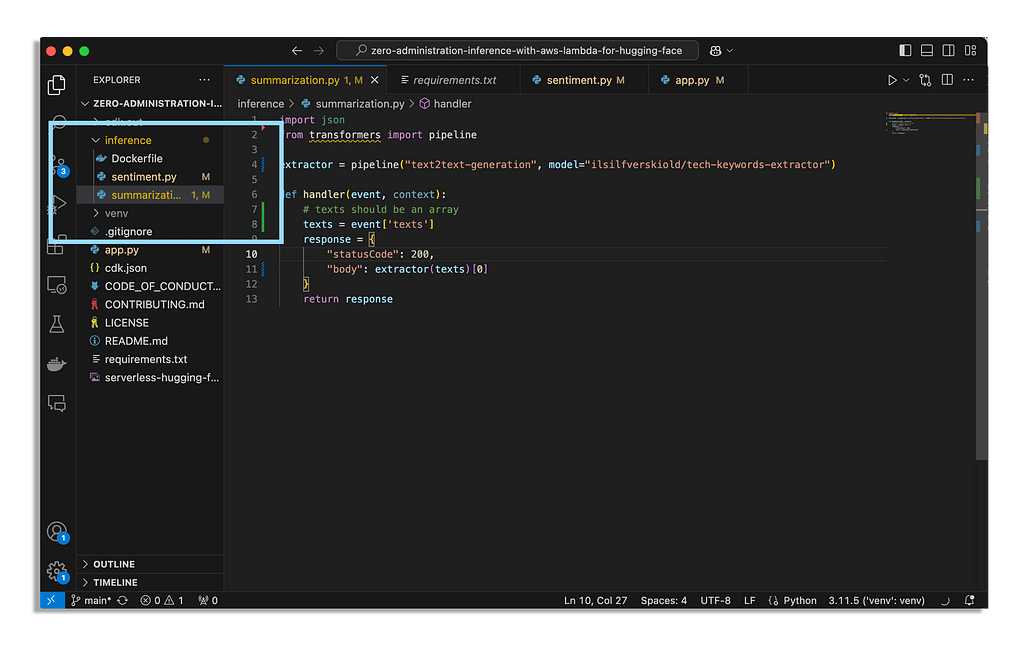
We can easy change the models in these files to the model’s we want.
If you go to the HuggingFace hub and locate a model you are interested in.
I will go with one of mine.
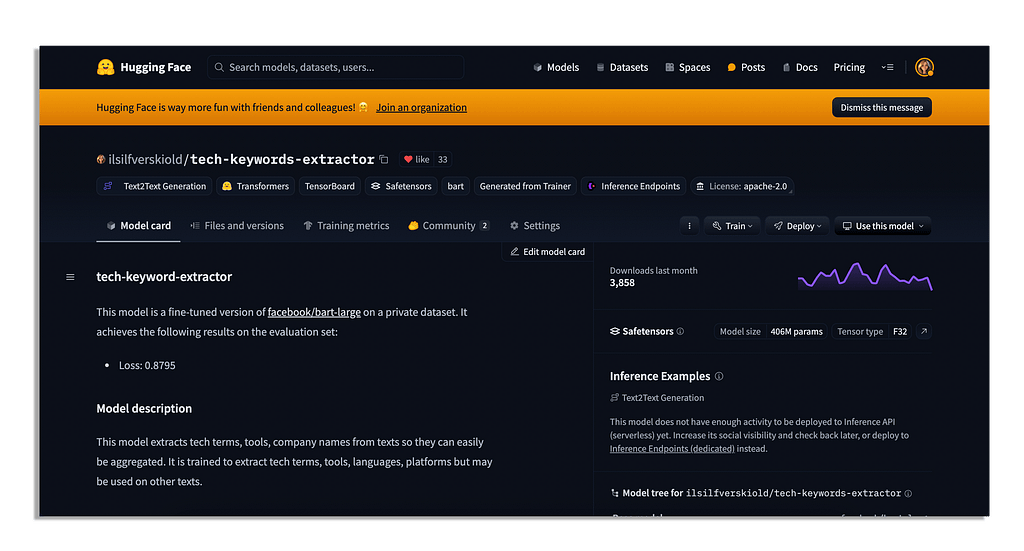
If you’re interested in how to build a model like this you can see a tutorial here for the keyword extractor and here for text classification.
Once you’ve located a model you are interested in, you can click on the button ‘Use this model’.
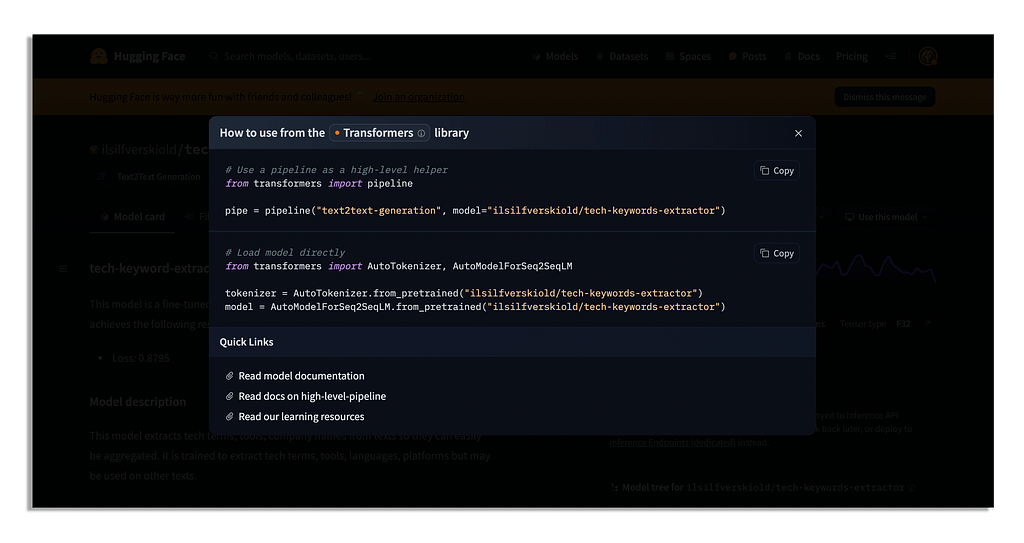
As you see we have two choices here but seeing as this script is using the pipeline we can do so as well.
I have changed the code in the below file with a new model while also expecting ‘texts’ for batching rather than just ‘text.’
# inference/summarization.py

import json
from transformers import pipeline

extractor = pipeline("text2text-generation", model="ilsilfverskiold/tech-keywords-extractor")

def handler(event, context):
    # texts should be an array
    texts = event['texts']
    response = {
        "statusCode": 200,
        "body": extractor(texts)[0]
    }
    return response
You can look into the image above to see the file structure.
I changed both scripts with different models that I usually use. Make sure you save the scripts once you are done.
Then you can set up a virtual env in a terminal.
python3 -m venv venv
source venv/bin/activate
Make sure you have NodeJS 18 before you download the requirements.
pip install -r requirements.txt
Before you can do anything else you need to make sure that the user you have configured with the AWS CDK has the correct permissions.
{
    "Version": "2012-10-17",
    "Statement": [
        {
            "Effect": "Allow",
            "Action": [
                "ecr:*",
                "ssm:*",
                "iam:*",
                "lambda:*",
                "s3:*",
                "ec2:*",
                "logs:*",
                "cloudformation:*",
                "elasticfilesystem:*"
            ],
            "Resource": "*"
        }
    ]
}
After this you can run bootstrap.
cdk bootstrap
If you have issues here check if the aws-cdk-lib is installed and if not re-install it.
pip install aws-cdk-lib
cdk bootstrap
Once you hit this, the command will create a Cloudformation stack.
If you run into issues here with ECR, create the repository manually.
If you have Docker running on your computer you can now deploy via your terminal.
cdk deploy
From here the CDK starts building a Docker image for the Lambda function using the Dockerfile in your inference folder. Each Lambda function has been provisioned with 8 GB of memory and a 600-second timeout.
It will create a VPC that has an Internet Gateway, EFS for caching the models, several Docker-based Lambda functions for hosting both of the models in the script and a few IAM roles for Lambda execution.
This will take some time.
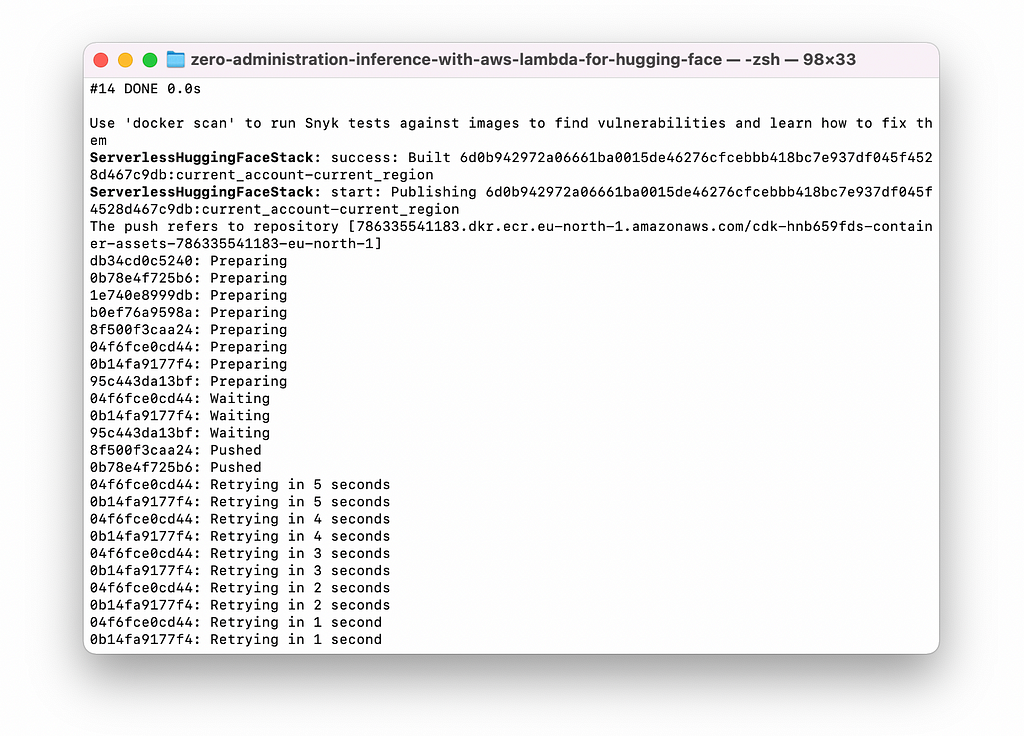
I was sitting in a small village in Italy doing this so my internet connection failed and I had to rent a GPU machine to deploy.
This may not happen to you but just make sure you have enough juice and a stable internet connection to deploy.
Once you have deployed you can go to Lambda in the AWS console and look for your new functions. You can test them directly there. The first run will be slower but once it is warm it is a bit faster.
Some notes here, since the Lambda function is in a private subnet (inside the VPC), it cannot access the internet, which is why AWS will create a NAT Gateway for you. Using a NAT Gateway is though price-y, and will incur costs of around $1-$3 per day regardless of how much it is used.
We could try to put the Lambda function inside a public subnet but alas I did not try it. There may be a way to go around this creating VPC Endpoints.
We do need a VPC for EFS, so we can cache the models, so they do not need to be downloaded each time you invoke the function. Yes, AWS Lambda has a very generous free-tier but it may incur other costs that you need to be aware of when we add other resources.
Once you’re done testing I would recommend you destroy the resources so you do not pay for a NAT Gateway round the clock.
cdk destroy
An additional note on using this method, you can not specify memory and CPU seperately. If you need more CPU you need to increase memory which can get expensive.
However, I wouldn’t fully disregard AWS Lambda when using smaller models of 125M parameters or less. You can provision a Lambda function with less memory.
Deployment to Modal
Modal has been created for the use of deploying ML models which will make this process a lot cleaner. The script we’ll use here to deploy the same model as before you’ll find here.
We can specify memory, CPU and GPU within our function directly when we deploy. We can also ask for an endpoint to be created for us within the script which will make it easier to test our model with an endpoint.
However, just because we’re using another platform, this does not mean that it won’t cost us a bit as well.
Remember the calculations we did before.
To get started you’ll need a Modal account and python3 installed. After you have created one we can open up a terminal and create a new folder.
mkdir testing_modal
cd testing_modal
We can then set up a virtual environment.
python3 -m venv venv
source venv/bin/activate
Install the Modal package using pip.
pip install modal
With Modal, all the resources, environment setup, and execution happen on their platform, not locally, so we won’t have the same issues as we did with deploying to AWS.
To authenticate you run this.
python3 -m modal setup
Now if you do not have any files in the folder create one.
touch text.py
You can simply paste the code below into it but we’ll also go through it.
# text.py
import modal
from pydantic import BaseModel
from typing import List

app = modal.App("text-generation") # set an app name
model_repo_id = "ilsilfverskiold/tech-keywords-extractor" # decide on your model repo
cache_dir = "/cache"

image = (
    modal.Image.debian_slim()
    .pip_install(
        "huggingface-hub==0.16.4",
        "transformers",
        "torch"
    )
)

# have these loaded in modal rather than locally
with image.imports():
    import torch
    from transformers import AutoTokenizer, AutoModelForSeq2SeqLM

# set up the function to run for extracting keywords from texts (as per the model we're using)
# the snapshot download should download the model on build and cache it
@app.cls(cpu=1, memory=3000, image=image) # define cpu (cores), memory and/if gpu - default CPU request is 0.1 cores the soft CPU limit is 4.1 cores - default 128 MiB of memory
class TextExtraction:
    @modal.build()
    def download_model(self):
        from huggingface_hub import snapshot_download
        snapshot_download(repo_id=model_repo_id, cache_dir=cache_dir)

    @modal.enter()
    def load_model(self):
        self.tokenizer = AutoTokenizer.from_pretrained(model_repo_id, cache_dir=cache_dir)
        self.model = AutoModelForSeq2SeqLM.from_pretrained(model_repo_id, cache_dir=cache_dir)

    @modal.method()
    def extract_text(self, texts):
        inputs = self.tokenizer(texts, return_tensors="pt", padding=True, truncation=True)
        outputs = self.model.generate(**inputs, max_new_tokens=100)
        generated_texts = [self.tokenizer.decode(output, skip_special_tokens=True) for output in outputs]

        return generated_texts

class TextsRequest(BaseModel):
    texts: List[str]

# set up the web endpoint
@app.function(image=image)
@modal.web_endpoint(method="POST", label=f"{model_repo_id.split('/')[-1]}-web", docs=True)
def generate_web(request: TextsRequest):
    texts = request.texts
    extracted_texts = TextExtraction().extract_text.remote(texts)
    return {"extracted_texts": extracted_texts}
    # add potential error handling
Remember that I am using the same model, you may use another one.
To deploy you simply run.
modal deploy text.py
This script sets up an app in Modal called "text-generation" and builds a Docker image with the needed dependencies (huggingface-hub, transformers, and torch).
It installs these directly in Modal’s environment, so you don’t have to deal with it locally. The app asks for 1 CPU core and 3 GB of memory, which is the setup I used during testing.
Model caching is handled by @modal.build(), where it uses snapshot_download() to pull the model from Hugging Face and saves it in /cache. We need to do this so it can be evoked faster on cold starts.
The @modal.enter() decorator runs when the TextExtraction class gets called for the first time, loading the tokenizer and model from the cached files into memory.
Once the model is loaded, you can call the extract_text() method to run inference. The @modal.web_endpoint sets up a serverless API endpoint that lets you hit extract_text() via a POST request and get your text extraction results back.
The whole thing runs in Modal’s environment so we don’t need to worry about your computer having enough juice. This is more important with larger models of course.
Once it has been deployed you’ll see something like this in the terminal with your endpoint.
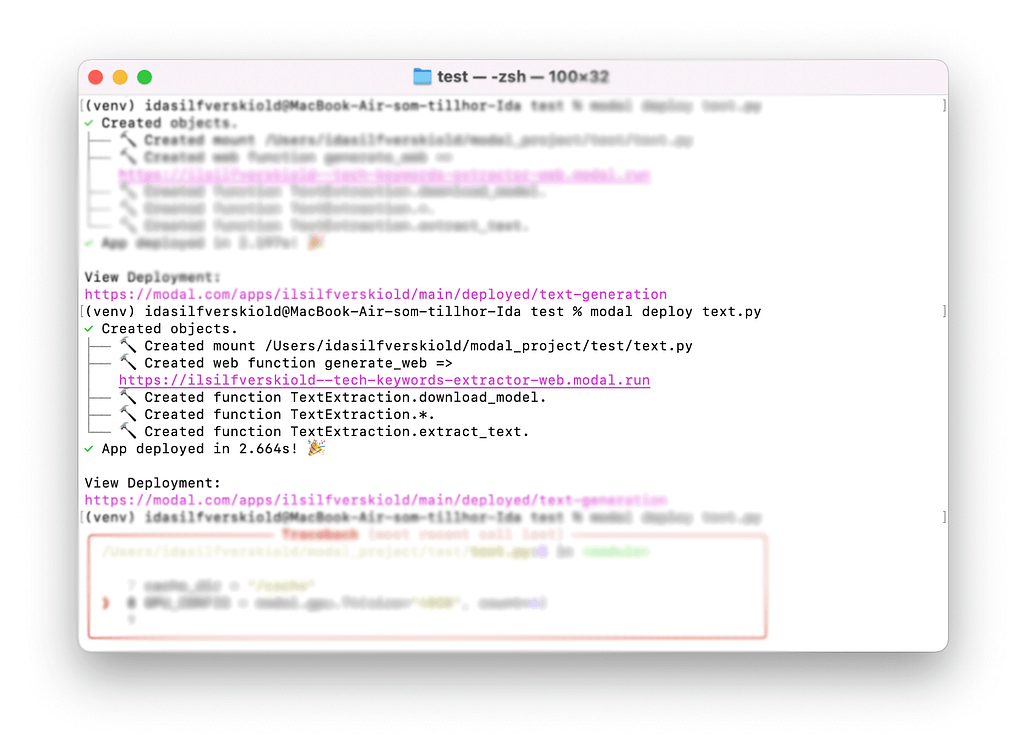
You’ll be able to see this application in your Modal dashboard.
To run this function you can call the url you got back in the terminal.
curl -X POST "https://<your-modal-endpoint-url>" \
-H "Content-Type: application/json" \
-d '{"texts": ["Artificial intelligence in healthcare represents a collection of multiple technologies enabling machines to sense, comprehend, act, and learn"]}'
This does not add in authentication, please see docs here from Modal to add this in.
Some Notes
As you’ve learned by now, using any deployment choice you need to first cache the model on build time to make sure the cold boot is faster once you scale down. If you want to try to deploy to any other platform you can see all get started scripts here.
Going with a new platform isn’t necessarily bad, and will be much faster. However, sometimes your organisation is strict with the platforms you are allowed to use.
The cost may also be slightly steeper with an easier choice, but the ones I have shown you aren’t that far from EC2 directly in terms of cost.
If you’ve reached it this far I hope you get some intel into the research I’ve done here and that it will help you pick a vendor.
❤
Economics of Hosting Open Source LLMs was originally published in Towards Data Science on Medium, where people are continuing the conversation by highlighting and responding to this story.
from Datascience in Towards Data Science on Medium https://ift.tt/VCAfxMO
via IFTTT

