How to Build a General-Purpose LLM Agent
A Step-by-Step Guide
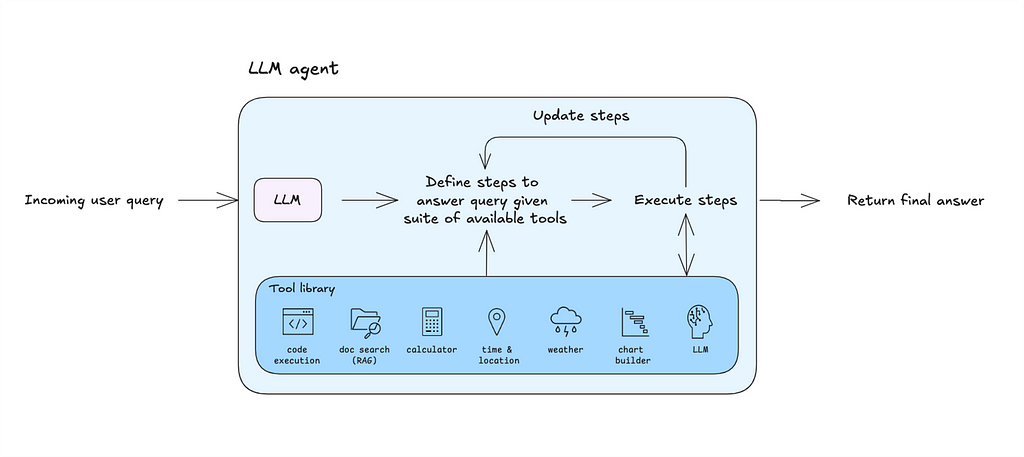
Why build a general-purpose agent? Because it’s an excellent tool to prototype your use cases and lays the groundwork for designing your own custom agentic architecture.
Before we dive in, let’s quickly introduce LLM agents. Feel free to skip ahead.
What is an LLM agent?
An LLM agent is a program whose execution logic is controlled by its underlying model.
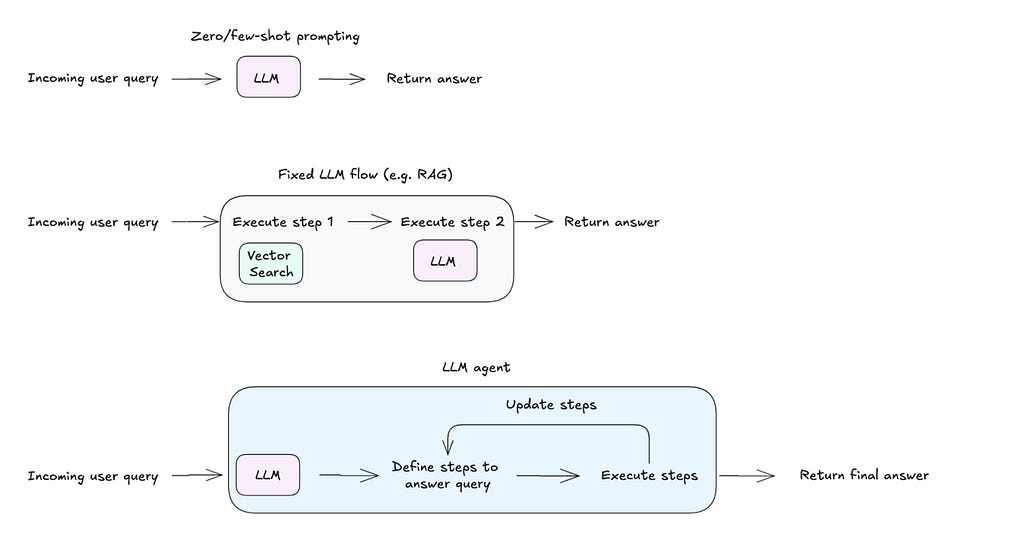
What sets an LLM agent apart from approaches like few-shot prompting or fixed workflows is its ability to define and adapt the steps required to execute a user’s query. Given access to a set of tools (like code execution or web search), the agent can decide which tool to use, how to use it, and iterate on results based on the output. This adaptability enables the system to handle diverse use cases with minimal configuration.

Agentic architectures exist on a spectrum, ranging from the reliability of fixed workflows to the flexibility of autonomous agents. For instance, a fixed flow like Retrieval-Augmented Generation (RAG) can be enhanced with a self-reflection loop, enabling the program to iterate when the initial response falls short. Alternatively, a ReAct agent can be equipped with fixed flows as tools, offering a flexible yet structured approach. The choice of architecture ultimately depends on the use case and the desired trade-off between reliability and flexibility.
For a deeper overview, check out this video.
Let’s build a general-purpose LLM agent from scratch!
Step 1. Select the right LLM
Choosing the right model is critical to achieving your desired performance. There are several factors to consider, like licensing, cost, and language support. The most important consideration for building an LLM agent is the model’s performance on key tasks like coding, tool calling, and reasoning. Benchmarks to evaluate include:
- Massive Multitask Language Understanding (MMLU) (reasoning)
- Berkeley’s Function Calling Leaderboard (tool selection & tool calling)
- HumanEval and BigCodeBench (coding)
Another crucial factor is the model’s context window. Agentic workflows can eat up a lot of tokens — sometimes 100K or more — a larger context window is really helpful.
Models to Consider (at the time of writing)
- Frontier models: GPT4-o, Claude 3.5
- Open-source models: Llama3.2, Qwen2.5.
In general, larger models tend to offer better performance, but smaller models that can run locally are still a solid option. With smaller models, you’ll be limited to simpler use cases and might only be able to connect your agent to one or two basic tools.
Step 2. Define the agent’s control logic (aka communication structure)
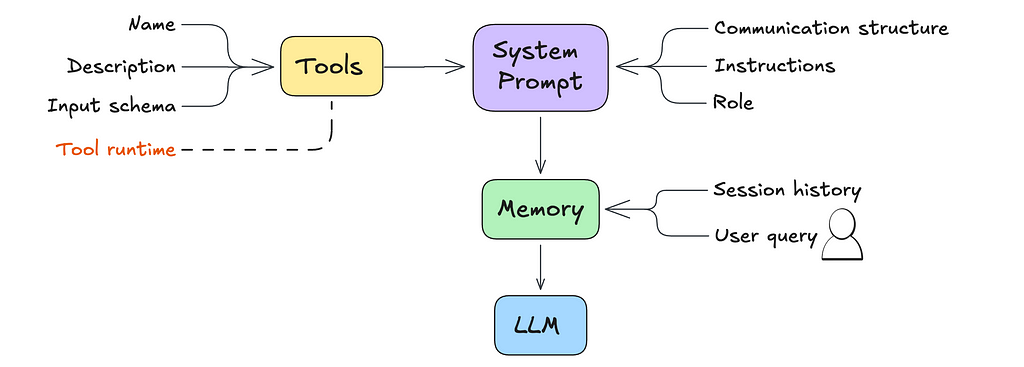
The main difference between a simple LLM and an agent comes down to the system prompt.
The system prompt, in the context of an LLM, is a set of instructions and contextual information provided to the model before it engages with user queries.
The agentic behavior expected of the LLM can be codified within the system prompt.
Here are some common agentic patterns, which can be customized to fit your needs:
- Tool Use: The agent determines when to route queries to the appropriate tool or rely on its own knowledge.
- Reflection: The agent reviews and corrects its answers before responding to the user. A reflection step can also be added to most LLM systems.
- Reason-then-Act (ReAct): The agent iteratively reasons through how to solve the query, performs an action, observes the outcome, and determines whether to take another action or provide a response.
- Plan-then-Execute: The agent plans upfront by breaking the task into sub-steps (if needed) and then executes each step.
The last two patterns — ReAct and Plan-then-Execute — aare often the best starting point for building a general-purpose single agent.

To implement these behaviors effectively, you’ll need to do some prompt engineering. You might also want to use a structured generation technique. This basically means shaping the LLM’s output to match a specific format or schema, so the agent’s responses stay consistent with the communication style you’re aiming for.
Example: Below is a system prompt excerpt for a ReAct style agent from the Bee Agent Framework.
# Communication structure
You communicate only in instruction lines. The format is: "Instruction: expected output". You must only use these instruction lines and must not enter empty lines or anything else between instruction lines.
You must skip the instruction lines Function Name, Function Input and Function Output if no function calling is required.

Message: User's message. You never use this instruction line.
Thought: A single-line plan of how to answer the user's message. It must be immediately followed by Final Answer.
Thought: A single-line step-by-step plan of how to answer the user's message. You can use the available functions defined above. This instruction line must be immediately followed by Function Name if one of the available functions defined above needs to be called, or by Final Answer. Do not provide the answer here.
Function Name: Name of the function. This instruction line must be immediately followed by Function Input.
Function Input: Function parameters. Empty object is a valid parameter.
Function Output: Output of the function in JSON format.
Thought: Continue your thinking process.
Final Answer: Answer the user or ask for more information or clarification. It must always be preceded by Thought.

## Examples
Message: Can you translate "How are you" into French?
Thought: The user wants to translate a text into French. I can do that.
Final Answer: Comment vas-tu?
Step 3. Define the agent’s core instructions
We tend to take for granted that LLMs come with a bunch of features right out of the box. Some of these are great, but others might not be exactly what you need. To get the performance you’re after, it’s important to spell out all the features you want — and don’t want — in the system prompt.
This could include instructions like:
- Agent Name and Role: What the agent is called and what it’s meant to do.
- Tone and Conciseness: How formal or casual it should sound, and how brief it should be.
- When to Use Tools: Deciding when to rely on external tools versus the model’s own knowledge.
- Handling Errors: What the agent should do when something goes wrong with a tool or process.
Example: Below is a snippet of the instructions section from the Bee Agent Framework.
# Instructions
User can only see the Final Answer, all answers must be provided there.
You must always use the communication structure and instructions defined above. Do not forget that Thought must be a single-line immediately followed by Final Answer.
You must always use the communication structure and instructions defined above. Do not forget that Thought must be a single-line immediately followed by either Function Name or Final Answer.
Functions must be used to retrieve factual or historical information to answer the message.
If the user suggests using a function that is not available, answer that the function is not available. You can suggest alternatives if appropriate.
When the message is unclear or you need more information from the user, ask in Final Answer.

# Your capabilities
Prefer to use these capabilities over functions.
- You understand these languages: English, Spanish, French.
- You can translate and summarize, even long documents.

# Notes
- If you don't know the answer, say that you don't know.
- The current time and date in ISO format can be found in the last message.
- When answering the user, use friendly formats for time and date.
- Use markdown syntax for formatting code snippets, links, JSON, tables, images, files.
- Sometimes, things don't go as planned. Functions may not provide useful information on the first few tries. You should always try a few different approaches before declaring the problem unsolvable.
- When the function doesn't give you what you were asking for, you must either use another function or a different function input.
  - When using search engines, you try different formulations of the query, possibly even in a different language.
- You cannot do complex calculations, computations, or data manipulations without using functions.m
Step 4. Define and optimize your core tools
Tools are what give your agents their superpowers. With a narrow set of well-defined tools, you can achieve broad functionality. Key tools to include are code execution, web search, file reading, and data analysis.
For each tool, you’ll need to define the following and include it as part of the system prompt:
- Tool Name: A unique, descriptive name for the capability.
- Tool Description: A clear explanation of what the tool does and when to use it. This helps the agent determine when to pick the right tool.
- Tool Input Schema: A schema that outlines required and optional parameters, their types, and any constraints. The agent uses this to fill in the inputs it needs based on the user’s query..
- A pointer to where/how to run the tool.
Example: Below is an excerpt of an Arxiv tool implementation from Langchain Community.
class ArxivInput(BaseModel):
    """Input for the Arxiv tool."""

    query: str = Field(description="search query to look up")


class ArxivQueryRun(BaseTool):  # type: ignore[override, override]
    """Tool that searches the Arxiv API."""

    name: str = "arxiv"
    description: str = (
        "A wrapper around Arxiv.org "
        "Useful for when you need to answer questions about Physics, Mathematics, "
        "Computer Science, Quantitative Biology, Quantitative Finance, Statistics, "
        "Electrical Engineering, and Economics "
        "from scientific articles on arxiv.org. "
        "Input should be a search query."
    )
    api_wrapper: ArxivAPIWrapper = Field(default_factory=ArxivAPIWrapper)  # type: ignore[arg-type]
    args_schema: Type[BaseModel] = ArxivInput

    def _run(
        self,
        query: str,
        run_manager: Optional[CallbackManagerForToolRun] = None,
    ) -> str:
        """Use the Arxiv tool."""
        return self.api_wrapper.run(query)p
In certain cases, you’ll need to optimize tools to get the performance you’re looking for. This might involve tweaking the tool name or description with some prompt engineering, setting up advanced configurations to handle common errors, or filtering the tool’s output.
Step 5. Decide on a memory handling strategy
LLMs are limited by their context window — the number of tokens they can “remember” at a time. This memory can fill up fast with things like past interactions in multi-turn conversations, lengthy tool outputs, or extra context the agent is grounded on. That’s why having a solid memory handling strategy is crucial.
Memory, in the context of an agent, refers to the system’s capability to store, recall, and utilize information from past interactions. This enables the agent to maintain context over time, improve its responses based on previous exchanges, and provide a more personalized experience.
Common Memory Handling Strategies:
- Sliding Memory: Keep the last k conversation turns in memory and drop the older ones.
- Token Memory: Keep the last n tokens and forget the rest.
- Summarized Memory: Use the LLM to summarize the conversation at each turn and drop the individual messages.
Additionally, you can also have an LLM detect key moments to store in long-term memory. This allows the agent to “remember” important facts about the user, making the experience even more personalized.
The five steps we’ve covered so far lay the foundation for setting up an agent. But what happens if we run a user query through our LLM at this stage?
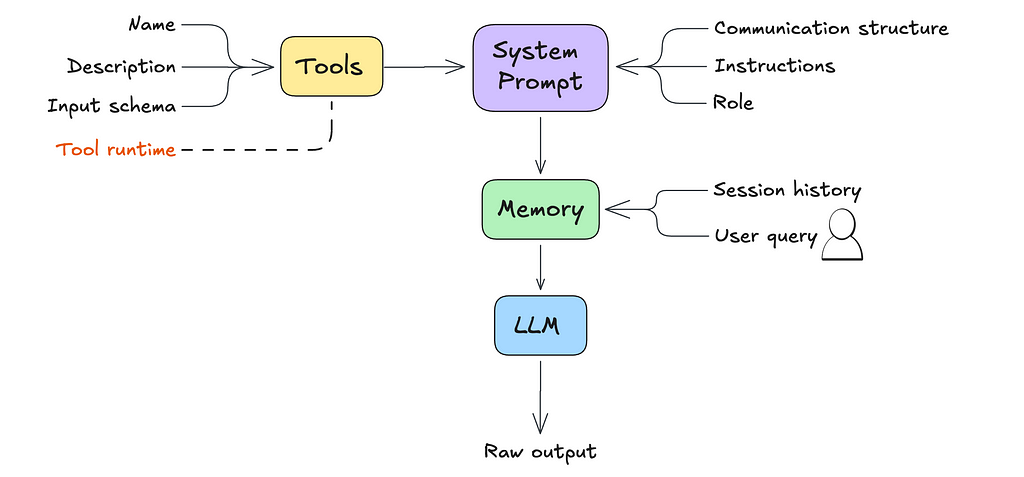
Here’s an example of what that might look like:
User Message: Extract key insighs from this dataset
Files: bill-of-materials.csv
Thought: First, I need to inspect the columns of the dataset and provide basic data statistics.
Function Name: Python
Function Input: {"language":"python","code":"import pandas as pd\n\ndataset = pd.read_csv('bill-of-materials.csv')\n\nprint(dataset.columns)\nprint(dataset.describe())","inputFiles":["bill-of-materials.csv"]}
At this point, the agent produces raw text output. So how do we get it to actually execute the next step? That’s where parsing and orchestration come in.
Step 6. Parse the agent’s raw output
A parser is a function that converts raw data into a format your application can understand and work with (like an object with properties)
For the agent we’re building, the parser needs to recognize the communication structure we defined in Step 2 and return a structured output, like JSON. This makes it easier for the application to process and execute the agent’s next steps.
Note: some model providers like OpenAI, can return parsable outputs by default. For other models, especially open-source ones, this would need to be configured.
Step 7. Orchestrate the agent’s next step
The final step is setting up the orchestration logic. This determines what happens after the LLM outputs a result. Depending on the output, you’ll either:
- Execute a tool call, or
- Return an answer — either the final response to the user’s query or a follow-up request for more information.
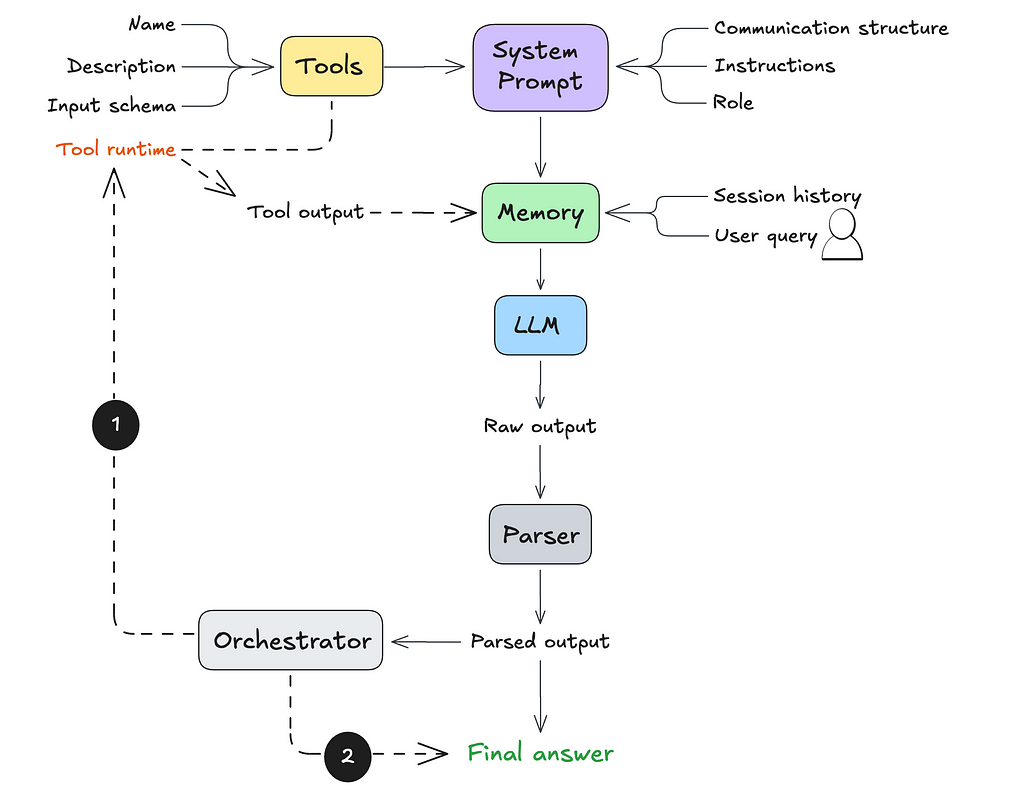
If a tool call is triggered, the tool’s output is sent back to the LLM (as part of its working memory). The LLM would then determine what to do with this new information: either performan another tool call or return an answer to the user.
Here’s an example of how this orchestration logic might look in code:
def orchestrator(llm_agent, llm_output, tools, user_query):
    """
    Orchestrates the response based on LLM output and iterates if necessary.

    Parameters:
    - llm_agent (callable): The LLM agent function for processing tool outputs.
    - llm_output (dict): Initial output from the LLM, specifying the next action.
    - tools (dict): Dictionary of available tools with their execution methods.
    - user_query (str): The original user query.

    Returns:
    - str: The final response to the user.
    """
    while True:
        action = llm_output.get("action")

        if action == "tool_call":
            # Extract tool name and parameters
            tool_name = llm_output.get("tool_name")
            tool_params = llm_output.get("tool_params", {})

            if tool_name in tools:
                try:
                    # Execute the tool
                    tool_result = tools[tool_name](**tool_params)
                    # Send tool output back to the LLM agent for further processing
                    llm_output = llm_agent({"tool_output": tool_result})
                except Exception as e:
                    return f"Error executing tool '{tool_name}': {str(e)}"
            else:
                return f"Error: Tool '{tool_name}' not found."

        elif action == "return_answer":
            # Return the final answer to the user
            return llm_output.get("answer", "No answer provided.")

        else:
            return "Error: Unrecognized action type from LLM output."
And voilà! You now have a system capable of handling a wide variety of use cases — from competitive analysis and advanced research to automating complex workflows.
Where do multi-agent systems come in?
While this generation of LLMs is incredibly powerful, they have a key limitation: they struggle with information overload. Too much context or too many tools can overwhelm the model, leading to performance issues. A general-purpose single agent will eventually hit this ceiling, especially since agents are notoriously token-hungry.
For certain use cases, a multi-agent setup might make more sense. By dividing responsibilities across multiple agents, you can avoid overloading the context of a single LLM agent and improve overall efficiency.
That said, a general-purpose single-agent setup is a fantastic starting point for prototyping. It can help you quickly test your use case and identify where things start to break down. Through this process, you can:
- Understand which parts of the task truly benefit from an agentic approach.
- Identify components that can be spun off as standalone processes in a larger workflow.
Starting with a single agent gives you valuable insights to refine your approach as you scale to more complex systems.
What is the best way to get started?
Ready to dive in and start building? Using a framework can be a great way to quickly test and iterate on your agent configuration.
- Planning on using frontier models like OpenAI? Try this tutorial from LangGraph.
- Planning on using open-source models like Llama 3.2? Try this starter template from the Bee Agent Framework.
What’s your experience building general-purpose agents?
Share your in the comments!
How to Build a General-Purpose LLM Agent was originally published in Towards Data Science on Medium, where people are continuing the conversation by highlighting and responding to this story.
from AI in Towards Data Science on Medium https://ift.tt/5ktFuT2
via IFTTT


