Introduction to TensorFlow’s Functional API
Learn what the Functional API is, and how to build complex keras models using it

TensorFlow’s Sequential API helps the user to stack layers one on top of another, easily creating linear models, where the input of each layer is always the output of the previous one. But what happens when your model needs to handle multiple inputs or outputs, shared layers, or non-linear connections? In those scenarios, TensorFlow’s Functional API allows to build more advanced, flexible, and customizable models, giving the user the power to design the complex architectures mentioned above with ease.
This article will explain:
- What the Functional API is
- How to build a simple model with the Functional API
What is Tensorflow’s Functional API?
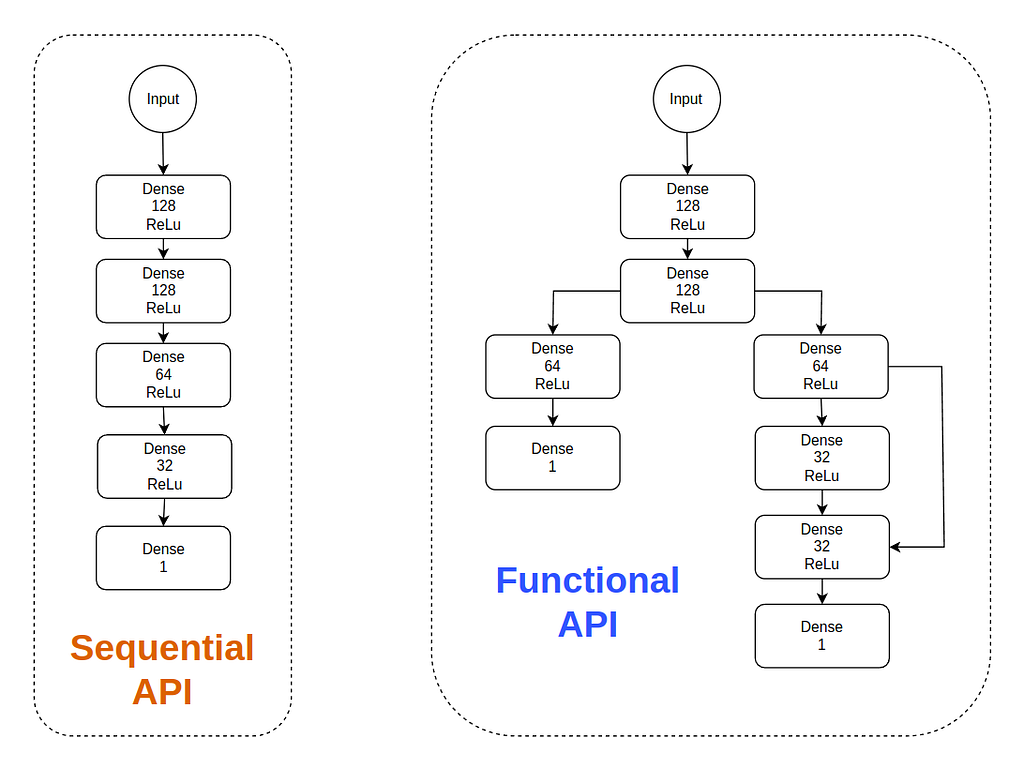
TensorFlow’s Functional API is a way to create models where layers are connected like a network graph, not just stacked linearly like in the Sequential API. Imagine building with LEGO bricks: while the Sequential API would just allow us to stack blocks one on top of another, the Functional API allows us to construct bridges, towers, and paths connecting different areas.
Three of the main reasons why TensorFlow’s functional API allows you to create more complex models than the sequential one are:
- Allows to build models with multiple inputs and outputs (like models that take both an image and text as input or models that output both classification and regression values).
- Allows to build models with shared layers (where two paths in the model reuse the same layer).
- Allows to build models with branching paths (like ResNet, where layers “skip” connections).

How the Functional API Works

As the above image shows, there are three fundamental components that will need to be defined each time you work with the TensorFlow’s functional API: the input, the layers, and the model. In the following code blocks, the definition of each of these components will be shown and explained.
Input
from tensorflow.keras.layers import Input

# Define input
inputs = Input(shape=(28, 28, 1))
As shown, the tf.keras.layers.Input class receives the shape of the data in the constructor, in this case (28, 28, 1), which is the shape of a 28×28 grayscale image.
Layers
from tensorflow.keras.layers import Dense, Flatten

# Define layers
flatten_layer = Flatten()
hidden_layer_1 = Dense(128, activation='relu')
hidden_layer_2 = Dense(64, activation='relu')
output_layer = Dense(10, activation='softmax')
In the Functional API, when you call a layer instance with some input, it will return the result of forwarding the received input through the layer. Because of this, layer chains are created by calling layer instances with the outputs of other layers, that is, joining the outputs of some layers to the inputs of other layers.
As shown in the code below, for the Sequential API layers are sequentially linked inside a list when creating the tf.keras.Sequential object, while for the Functional API layers are linked by joining layer inputs with layer outputs, by calling layers instances with the outputs of other layers.
# Sequential API
model = tf.keras.Sequential(layers=[inputs, flatten, hidden_layer_1, hidden_layer_2, output_layer])

# Functional API
x = flatten_layer(inputs)
x = hidden_layer_1(x)
x = hidden_layer_2(x)
outputs = output_layer(x)
Model
from tensorflow.keras.models import Model

model = Model(inputs=inputs, outputs=output_layer)
The only information that the tf.keras.models.Model class needs is which are the input and output layers.
Code Example: Create and Train a Model with the Functional API
In this section, a simple neural network will be created and used to classify 10 categories (digits 0–9). The data used for training and testing the model will be the popular and public MNIST dataset [1], which includes 60000 images of handwritten single digits between 0 and 9, with each image having a height and width of 28 pixels.

Create the model with the Functional API
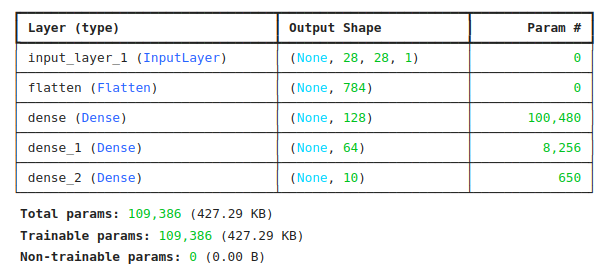
As explained in the previous section, 3 components are needed for correctly defining a tensorflow model: the input, the layers, and the model. These three components can be easily created, as shown in the code of the previous section. The following code uses the same code for the creation of the input, the layers, and the model. Finally, the summary of the model is shown, so that the structure of the model can be checked and reviewed.
from tensorflow.keras.layers import Input, Dense, Flatten
from tensorflow.keras.models import Model

# Define the input layer
inputs = Input(shape=(28, 28, 1))  # Input with 32 features
# Define the hidden and output layers and pass the input through them
x = Flatten()(inputs)
x = Dense(128, activation='relu')(x)
x = Dense(64, activation='relu')(x)
# Pass the output of the hidden layers through the output layer
outputs = Dense(10, activation='softmax')(x)
# Create the model
model = Model(inputs=inputs, outputs=outputs)
# Print the model summary
model.summary()

Load and Preprocess the Data
Once the model is defined, the data to train and test the model is loaded and preprocessed.
from tensorflow.keras.datasets import mnist
from tensorflow.keras.utils import to_categorical

(x_train, y_train), (x_test, y_test) = mnist.load_data()
x_train = x_train / 255.0
x_test = x_test / 255.0
y_train = to_categorical(y_train, 10)
y_test = to_categorical(y_test, 10)
Compile the TF Model
The model is compiled by passing the optimizer and loss function to be used for training, together with the metrics to be calculated and printed.
model.compile(optimizer='adam', loss='categorical_crossentropy', metrics=['accuracy'])
Train and Test the Model
Finally, the created and compiled model is trained and evaluated over the MNIST data. This training will run for 5 epochs and using batches of 32 images. Also, the 20% of the data will be validation data, which will be used along the training to provide insightful information about whether the model is correctly training or not.
# Train the model
history = model.fit(x_train, y_train, epochs=5, batch_size=32, validation_split=0.2)

# Evaluate the model on the test set
test_loss, test_acc = model.evaluate(x_test, y_test, verbose=2)
print("\nTest accuracy: {}".format(test_acc * 100))
Get Predictions From the Trained Model
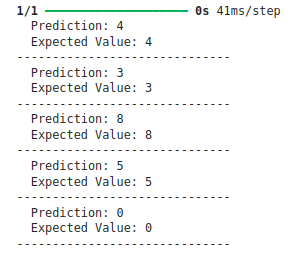
In order to evaluate the performance of the trained model, some test data is forwarded through the model to obtain the predictions. These predictions, together with the expected values, are printed, so that the difference between prediction and real value is visualized.
# Select a few random samples from the test set
import random
import numpy as np

indices = random.sample(range(len(x_test)), 5)
x_samples = x_test[indices]
y_samples = y_test[indices]

# Make predictions
predictions = model.predict(x_samples)

# Display predictions and true values
for i in range(5):
    print(f"  Prediction: {np.argmax(predictions[i])}")
    print(f"  Expected Value: {np.argmax(y_samples[i])}")
    print("-" * 30)

As can be inferred from the evaluation of the model, the training was successful, reaching a 97.57% accuracy on the test set and a 98.68% accuracy on the training set. These values are further confirmed in the above image, where the predictions and expected labels of some images of the test set are shown: the model correctly predicted the class for all the images.
Summary
In this article, the main differences between Functional and Sequential APIs have been mentioned, along with an explanation of the versatility and flexibility of coding neural networks with the Functional API. The three main components of building a model with the Functional API (input, layers and model) were presented and defined in code. Finally, the article shows how to successfully train and test a model created with the Functional API with the MNIST dataset.
Data
[1] The data used along the article is extracted from the MNIST dataset, which is available under a Creative Commons Attribution-Share Alike 3.0 license.
Huge thanks for reading the article! I hope this article may have helped you to better understand and use TensorFlow’s Functional API, and how to create models in this way.
Introduction to TensorFlow’s Functional API was originally published in Towards Data Science on Medium, where people are continuing the conversation by highlighting and responding to this story.
from AI in Towards Data Science on Medium https://ift.tt/tTwanoZ
via IFTTT


