Designing, Building & Deploying an AI Chat App from Scratch (Part 2)
Cloud Deployment and Scaling

1. Introduction
In the previous post, we built an AI-powered chat application on our local computer using microservices. Our stack included FastAPI, Docker, Postgres, Nginx and llama.cpp. The goal of this post is to learn more about the fundamentals of cloud deployment and scaling by deploying our app to Azure, making it available to real users. We’ll use Azure because they offer a free education account, but the process is similar for other platforms like AWS and GCP.
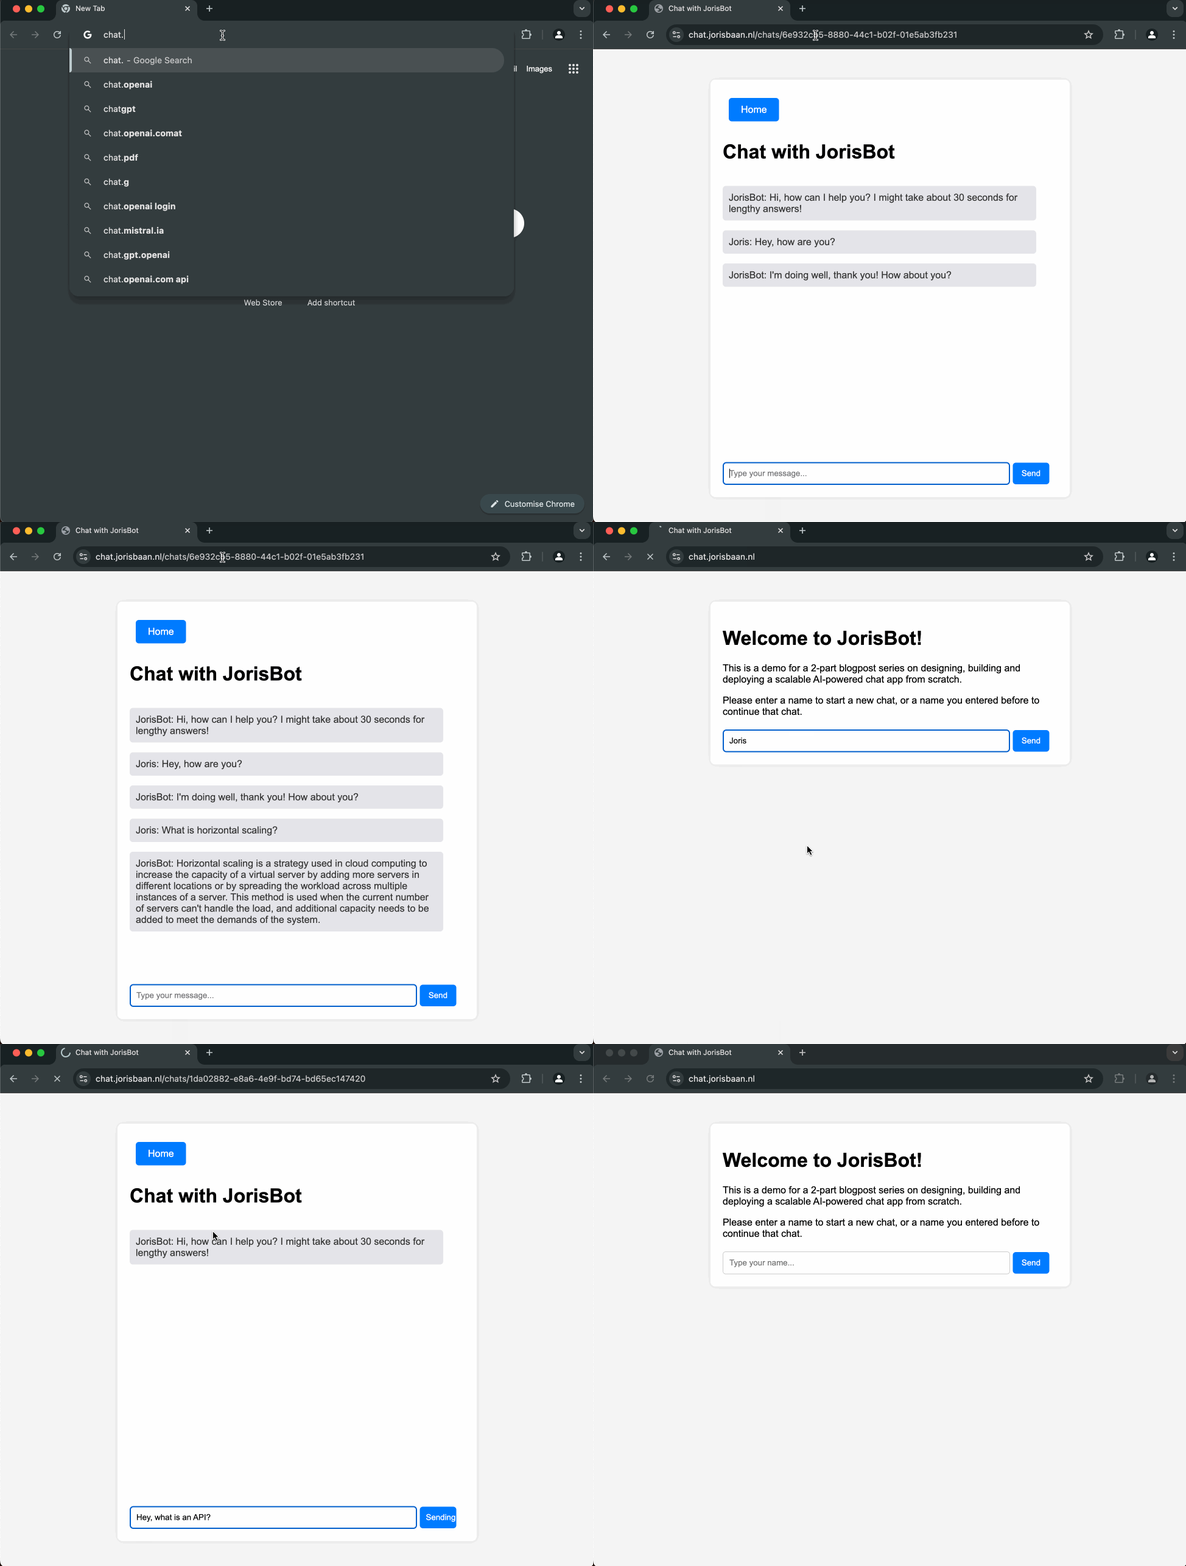
You can check a live demo of the app at chat.jorisbaan.nl. Now, obviously, this demo isn’t very large-scale, because the costs ramp up very quickly. With the tight scaling limits I configured I reckon it can handle about 10–40 concurrent users until I run out of Azure credits. However, I do hope it demonstrates the principles behind a scalable production system. We could easily configure it to scale to many more users with a higher budget.
I give a complete breakdown of our infrastructure and the costs at the end. The codebase is at https://github.com/jsbaan/ai-app-from-scratch.

1.1. Recap: local application
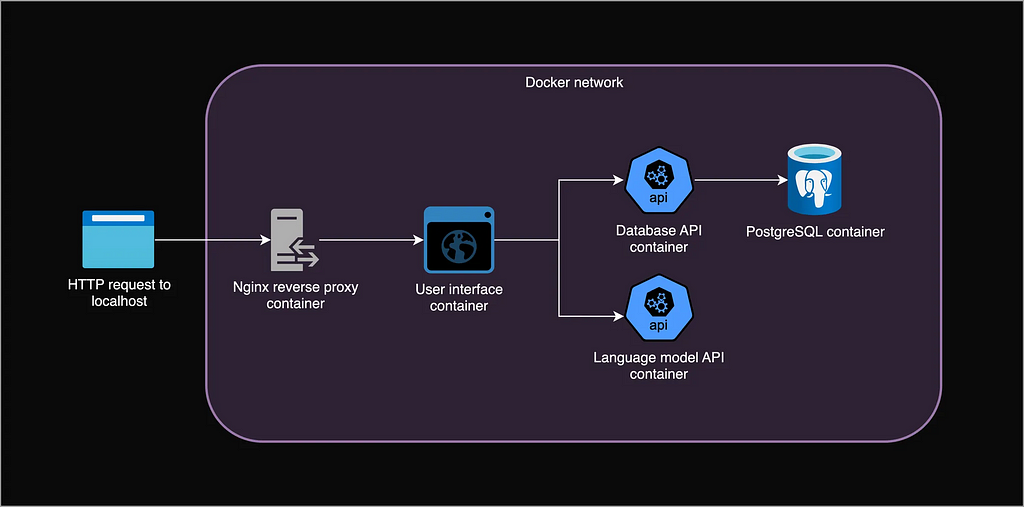
Let’s recap how we built our local app: A user can start or continue a chat with a language model by sending an HTTP request to http://localhost. An Nginx reverse proxy receives and forwards the request to a UI over a private Docker network. The UI stores a session cookie to identify the user, and sends requests to the backend: the language model API that generates text, and the database API that queries the database server.

Table of contents
- Introduction
1.1 Recap: local application - Cloud architecture
2.1 Scaling
2.2 Kubernetes Concepts
2.3 Azure Container Apps
2.4 Azure architecture: putting it all together - Deployment
3.1 Setting up
3.2 PostgreSQL server deployment
3.3 Azure Container App Environment deployment
3.4 Azure Container Apps deployment
3.5 Scaling our Container Apps
3.6 Custom domain name & HTTPS - Resources & costs overview
- Roadmap
- Final thoughts
Acknowledgements
AI usage
2. Cloud architecture
Conceptually, our cloud architecture will not be too different from our local application: a bunch of containers in a private network with a gateway to the outside world, our users.
However, instead of running containers on our local computer with Docker Compose, we will deploy them to a computing environment that automatically scales across virtual or psychical machines to many concurrent users.
2.1 Scaling
Scaling is a central concept in cloud architectures. It means being able to dynamically handle varying numbers of users (i.e., HTTP requests). Uvicorn, the web server running our UI and database API, can already handle about 40 concurrent requests. It’s even possible to use another web server called Gunicorn as a process manager that employs multiple Uvicorn workers in the same container, further increasing concurrency.
Now, if we want to support even more concurrent request, we could give each container more resources, like CPUs or memory (vertical scaling). However, a more reliable approach is to dynamically create copies (replicas) of a container based on the number of incoming HTTP requests or memory/CPU usage, and distribute the incoming traffic across replicas (horizontal scaling). Each replica container will be assigned an IP address, so we also need to think about networking: how to centrally receive all requests and distribute them over the container replicas.
This “prism” pattern is important: requests arrive centrally in some server (a load balancer) and fan out for parallel processing to multiple other servers (e.g., several identical UI containers).

2.2 Kubernetes Concepts
Kubernetes is the industry standard system for automating deployment, scaling and management of containerized applications. Its core concepts are crucial to understand modern cloud architectures, including ours, so let’s quickly review the basics.
- Node: A physical or virtual machine to run containerized app or manage the cluster.
- Cluster: A set of Nodes managed by Kubernetes.
- Pod: The smallest deployable unit in Kubernetes. Runs one main app container with optional secondary containers that share storage and networking.
- Deployment: An abstraction that manages the desired state of a set of Pod replicas by deploying, scaling and updating them.
- Service: An abstraction that manages a stable entrypoint (the service’s DNS name) to expose a set of Pods by distributing incoming traffic over the various dynamic Pod IP addresses. A Service has multiple types:
- A ClusterIP Service exposes Pods within the Cluster
- A LoadBalancer Service exposes Pods to outside the Cluster. It triggers the cloud provider to provision an external public IP and load balancer outside the cluster that can be used to reach the cluster. These external requests are then routed via the Service to individual Pods. - Ingress: An abstraction that defines more complex rules for a cluster’s entrypoint. It can route traffic to multiple Services; give Services externally-reachable URLs; load balance traffic; and handle secure HTTPS.
- Ingress Controller: Implements the Ingress rules. For example, an Nginx-based controller runs an Nginx server (like in our local app) under the hood that is dynamically configured to route traffic according to Ingress rules. To expose the Ingress Controller itself to the outside world, you can use a LoadBalancer Service. This architecture is often used.
2.3 Azure Container Apps
Armed with these concepts, instead of deploying our app with Kubernetes directly, I wanted to experiment a little by using Azure Container Apps (ACA). This is a serverless platform built on top of Kubernetes that abstracts away some of its complexity.
With a single command, we can create a Container App Environment, which, under the hood, is an invisible Kubernetes Cluster managed by Azure. Within this Environment, we can run a container as a Container App that Azure internally manages as Kubernetes Deployments, Services, and Pods. See article 1 and article 2 for detailed comparisons.
A Container App Environment also auto-creates:
- An invisible Envoy Ingress Controller that routes requests to internal Apps and handles HTTPS and App auto-scaling based on request volume.
- An external Public IP address and Azure Load Balancer that routes external traffic to the Ingress Controller that in turn routes it to Apps (sounds similar to a Kubernetes LoadBalancer Service, eh?).
- An Azure-generated URL for each Container App that is publicly accessible over the internet or internal, based on its Ingress config.
This gives us everything we need to run our containers at scale. The only thing missing is a database. We will use an Azure-managed PostgreSQL server instead of deploying our own container, because it’s easier, more reliable and scalable. Our local Nginx reverse proxy container is also obsolete because ACA automatically deploys an Envoy Ingress Controller.
It’s interesting to note that we literally don’t have to change a single line of code in our local application, we can just treat it as a bunch of containers!
2.4 Azure architecture: putting it all together
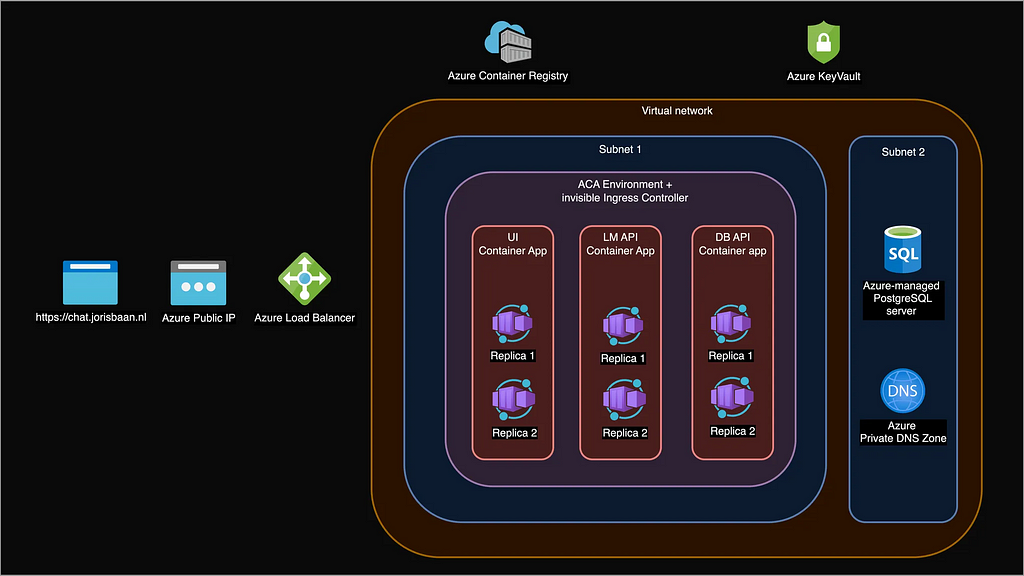
Here is a diagram of the full cloud architecture for our chat application that contains all our Azure resources. Let’s take a high level look at how a user request flows through the system.

- User sends HTTPS request to chat.jorisbaan.nl.
- A Public DNS server like Google DNS resolves this domain name to an Azure Public IP address.
- The Azure Load Balancer on this IP address routes the request to the (for us invisible) Envoy Ingress Controller.
- The Ingress Controller routes the request to UI Container App, who routes it to one of its Replicas where a UI web server is running.
- The UI web server makes requests to the database API and language model API Apps, who both route it to one of their Replicas.
- A database API replica queries the PostgreSQL server hostname. The Azure Private DNS Zone resolves the hostname to the PostgreSQL server’s IP address.
3. Deployment
So, how do we actually create all this? Rather than clicking around in the Azure Portal, infrastructure-as-code tools like Terraform are best to create and manage cloud resources. However, for simplicity, I will instead use the Azure CLI to create a bash script that deploys our entire application step by step. You can find the full deployment script including environment variables here 🤖. We will go through it step by step now.
3.1 Setting up
We need an Azure account (I’m using a free education account), a clone of the https://github.com/jsbaan/ai-app-from-scratch repo, Docker to build and push the container images, the downloaded model, and the Azure CLI to start creating cloud resources.
We first create a resource group so our resources are easier to find, manage and delete. The --location parameter refers to the physical datacenter we’ll use to deploy our app’s infrastructure. Ideally, it is close to our users. We then create a private virtual network with 256 IP addresses to isolate, secure and connect our database server and Container Apps.
brew update && brew install azure-cli # for macos

echo "Create resource group"
az group create \
  --name $RESOURCE_GROUP \
  --location "$LOCATION"

echo "Create VNET with 256 IP addresses"
az network vnet create \
  --resource-group $RESOURCE_GROUP \
  --name $VNET \
  --address-prefix 10.0.0.0/24 \
  --location $LOCATION
3.2 PostgreSQL server deployment
Depending on the hardware, an Azure-managed PostgreSQL database server costs about $13 to $7000 a month. To communicate with Container Apps, we put the DB server within the same private virtual network but in its own subnet. A subnet is a dedicated range of IP addresses that can have its own security and routing rules.
We create the Azure PostgreSQL Flexible Server with private access. This means only resources within the same virtual network can reach it. Azure automatically creates a Private DNS Zone that manages a hostname for the database that resolves to its IP address. The database API will later use this hostname to connect to the database server.
We will randomly generate the database credentials and store them in a secure place: Azure KeyVault.
echo "Create subnet for DB with 128 IP addresses"
az network vnet subnet create \
  --resource-group $RESOURCE_GROUP \
  --name $DB_SUBNET \
  --vnet-name $VNET \
  --address-prefix 10.0.0.128/25

echo "Create a key vault to securely store and retrieve secrets, \
like the db password"
az keyvault create \
  --name $KEYVAULT \
  --resource-group $RESOURCE_GROUP \
  --location $LOCATION

echo "Give myself access to the key vault so I can store and retrieve \
the db password"
az role assignment create \
  --role "Key Vault Secrets Officer" \
  --assignee $EMAIL \
  --scope "/subscriptions/$SUBSCRIPTION_ID/resourceGroups/$RESOURCE_GROUP/providers/Microsoft.KeyVault/vaults/$KEYVAULT"

echo "Store random db username and password in the key vault"
az keyvault secret set \
  --name postgres-username \
  --vault-name $KEYVAULT  \
  --value $(openssl rand -base64 12 | tr -dc 'a-zA-Z' | head -c 12)
az keyvault secret set \
  --name postgres-password \
  --vault-name $KEYVAULT  \
  --value $(openssl rand -base64 16)

echo "While we're at it, let's already store a secret session key for the UI"
az keyvault secret set \
  --name session-key \
  --vault-name $KEYVAULT  \
  --value $(openssl rand -base64 16)

echo "Create PostgreSQL flexible server in our VNET in its own subnet. \
Auto-creates Private DS Zone."
POSTGRES_USERNAME=$(az keyvault secret show --name postgres-username --vault-name $KEYVAULT --query "value" --output tsv)
POSTGRES_PASSWORD=$(az keyvault secret show --name postgres-password --vault-name $KEYVAULT --query "value" --output tsv)
az postgres flexible-server create \
  --resource-group $RESOURCE_GROUP \
  --name $DB_SERVER \
  --vnet $VNET \
  --subnet $DB_SUBNET \
  --location $LOCATION \
  --admin-user $POSTGRES_USERNAME \
  --admin-password $POSTGRES_PASSWORD \
  --sku-name Standard_B1ms \
  --tier Burstable \
  --storage-size 32 \
  --version 16 \
  --yes
3.3 Azure Container App Environment deployment
With the network and database in place, let’s deploy the infrastructure to run containers — the Container App Environment (recall, this is a Kubernetes cluster under the hood).
We create another subnet with 128 IP addresses and delegate its management to the Container App Environment. The subnet should be big enough for every ten new replicas to get a new IP address in the subrange. We can then create the Environment. This is just a single command without much configuration.
echo "Create subnet for ACA with 128 IP addresses."
az network vnet subnet create \
  --resource-group $RESOURCE_GROUP \
  --name $ACA_SUBNET \
  --vnet-name $VNET \
  --address-prefix 10.0.0.0/25

echo "Delegate the subnet to ACA"
az network vnet subnet update \
  --resource-group $RESOURCE_GROUP \
  --vnet-name $VNET \
  --name $ACA_SUBNET \
  --delegations Microsoft.App/environments

echo "Obtain the ID of our subnet"
ACA_SUBNET_ID=$(az network vnet subnet show \
  --resource-group $RESOURCE_GROUP \
  --name $ACA_SUBNET \
  --vnet-name $VNET \
  --query id --output tsv)

echo "Create Container Apps Environment in our custom subnet.\\
By default, it has a Workload profile with Consumption plan."
az containerapp env create \
  --resource-group $RESOURCE_GROUP \
  --name $ACA_ENVIRONMENT \
  --infrastructure-subnet-resource-id $ACA_SUBNET_ID \
  --location $LOCATION
3.4 Azure Container Apps deployment
Each Container App needs a Docker image to run. Let’s first setup a Container Registry, and then build all our images locally and push them to the registry. Note that we simply copied the model file into the language model image using its Dockerfile, so we don’t need to mount external storage like we did for local deployment in part 1.
echo "Create container registry (ACR)"
az acr create \\
  --resource-group $RESOURCE_GROUP \\
  --name $ACR \\
  --sku Standard \\
  --admin-enabled true

echo "Login to ACR and push local images"
az acr login --name $ACR
docker build --tag $ACR.azurecr.io/$DB_API $DB_API
docker push $ACR.azurecr.io/$DB_API
docker build --tag $ACR.azurecr.io/$LM_API $LM_API
docker push $ACR.azurecr.io/$LM_API
docker build --tag $ACR.azurecr.io/$UI $UI
docker push $ACR.azurecr.io/$UI
Now, onto deployment. To create Container Apps we specify their Environment, container registry, image, and the port they will listen to for requests. The ingress parameter regulates whether Container Apps can be reached from the outside world. Our two APIs are internal and therefore completely isolated, with no public URL and no traffic ever routed from the Envoy Ingress Controller. The UI is external and has a public URL, but sends internal HTTP requests over the virtual network to our APIs. We pass these internal hostnames and db credentials as environment variables.
echo "Deploy DB API on Container Apps with the db credentials from the key \
vault as env vars. More secure is to use a managed identity that allows the \
container itself to retrieve them from the key vault. But for simplicity we \
simply fetch it ourselves using the CLI."
POSTGRES_USERNAME=$(az keyvault secret show --name postgres-username --vault-name $KEYVAULT --query "value" --output tsv)
POSTGRES_PASSWORD=$(az keyvault secret show --name postgres-password --vault-name $KEYVAULT --query "value" --output tsv)
az containerapp create --name $DB_API \
  --resource-group $RESOURCE_GROUP \
  --environment $ACA_ENVIRONMENT \
  --registry-server $ACR.azurecr.io \
  --image $ACR.azurecr.io/$DB_API \
  --target-port 80 \
  --ingress internal \
  --env-vars "POSTGRES_HOST=$DB_SERVER.postgres.database.azure.com" "POSTGRES_USERNAME=$POSTGRES_USERNAME" "POSTGRES_PASSWORD=$POSTGRES_PASSWORD" \
  --min-replicas 1 \
  --max-replicas 5 \
  --cpu 0.5 \
  --memory 1

echo "Deploy UI on Container Apps, and retrieve the secret random session \
key the UI uses to encrypt session cookies"
SESSION_KEY=$(az keyvault secret show --name session-key --vault-name $KEYVAULT --query "value" --output tsv)
az containerapp create --name $UI \
  --resource-group $RESOURCE_GROUP \
  --environment $ACA_ENVIRONMENT \
  --registry-server $ACR.azurecr.io \
  --image $ACR.azurecr.io/$UI \
  --target-port 80 \
  --ingress external \
  --env-vars "db_api_url=http://$DB_API" "lm_api_url=http://$LM_API" "session_key=$SESSION_KEY" \
  --min-replicas 1 \
  --max-replicas 5 \
  --cpu 0.5 \
  --memory 1

echo "Deploy LM API on Container Apps"
az containerapp create --name $LM_API \
  --resource-group $RESOURCE_GROUP \
  --environment $ACA_ENVIRONMENT \
  --registry-server $ACR.azurecr.io \
  --image $ACR.azurecr.io/$LM_API \
  --target-port 80 \
  --ingress internal \
  --min-replicas 1 \
  --max-replicas 5 \
  --cpu 2 \
  --memory 4 \
  --scale-rule-name my-http-rule \
  --scale-rule-http-concurrency 2
3.5 Scaling our Container Apps
Let’s take a look at how our Container Apps they scale. Container Apps can scale to zero, which means they have zero replicas and stop running (and stop incurring costs). This is a feature of the serverless paradigm, where infrastructure is provisioned on demand. The invisible Envoy proxy handles scaling based on triggers, like concurrent HTTP requests. Spawning new replicas may take some time, which is called cold-start. We set the minimum number of replicas to 1 to avoid cold starts and the resulting timeout errors for first requests.
The default scaling rule creates a new replica whenever an existing replica receives 10 concurrent HTTP requests. This applies to the UI and the database API. To test whether this scaling rule makes sense, we would have to perform load testing to simulate real user traffic and see what each Container App replica can handle individually. My guess is that they can handle a lot more concurrent request than 10, and we could relax the rule.
3.5.1 Scaling language model inference.
Even with our small, quantized language model, inference requires much more compute than a simple FastAPI app. The inference server handles incoming requests sequentially, and the default Container App resources of 0.5 virtual CPU cores and 1GB memory result in very slow response times: up to 30 seconds for generating 128 tokens with a context window of 1024 (these parameters are defined in the LM API’s Dockerfile).
Increasing vCPU to 2 and memory to 4GB gives much better inference speed, and handles about 10 requests within 30 seconds. I configured the http scaling rule very tightly at 2 concurrent requests, so whenever 2 users chat at the same time, the LM API will scale out.
With 5 maximum replicas, I think this will allow for roughly 10–40 concurrent users, depending on the length of the chat histories. Now, obviously, this isn’t very large-scale, but with a higher budget, we could increase vCPUs, memory and the number of replicas. Ultimately we would need to move to GPU-based inference. More on that later.
3.6 Custom domain name & HTTPS
The automatically generated URL from the UI App looks like https://chat-ui.purplepebble-ac46ada4.germanywestcentral.azurecontainerapps.io/. This isn’t very memorable, so I want to make our app available as subdomain on my website: chat.jorisbaan.nl.
I simply add two DNS records on my domain registrar portal (like GoDaddy). A CNAME record that links my chat subdomain to the UI’s URL, and TXT record to prove ownership of the subdomain to Azure and obtain a TLS certificate.
# Obtain UI URL and verification code
URL=$(az containerapp show -n $UI -g $RESOURCE_GROUP -o tsv --query "properties.configuration.ingress.fqdn")
VERIFICATION_CODE=$(az containerapp show -n $UI -g $RESOURCE_GROUP -o tsv --query "properties.customDomainVerificationId")

# Add a CNAME record with the URL and a TXT record with the verification code to domain registrar
# (Do this manually)

# Add custom domain name to UI App
az containerapp hostname add --hostname chat.jorisbaan.nl -g $RESOURCE_GROUP -n $UI
# Configure managed certificate for HTTPS
az containerapp hostname bind --hostname chat.jorisbaan.nl -g $RESOURCE_GROUP -n $UI --environment $ACA_ENVIRONMENT --validation-method CNAME
Container Apps manages a free TLS certificate for my subdomain as long as the CNAME record points directly to the container’s domain name.
The public URL for the UI changes whenever I tear down and redeploy an Environment. We could use a fancier service like Azure Front Door or Application Gateway to get a stable URL and act as reverse proxy with additional security, global availability, and edge caching.
4. Resources & costs overview
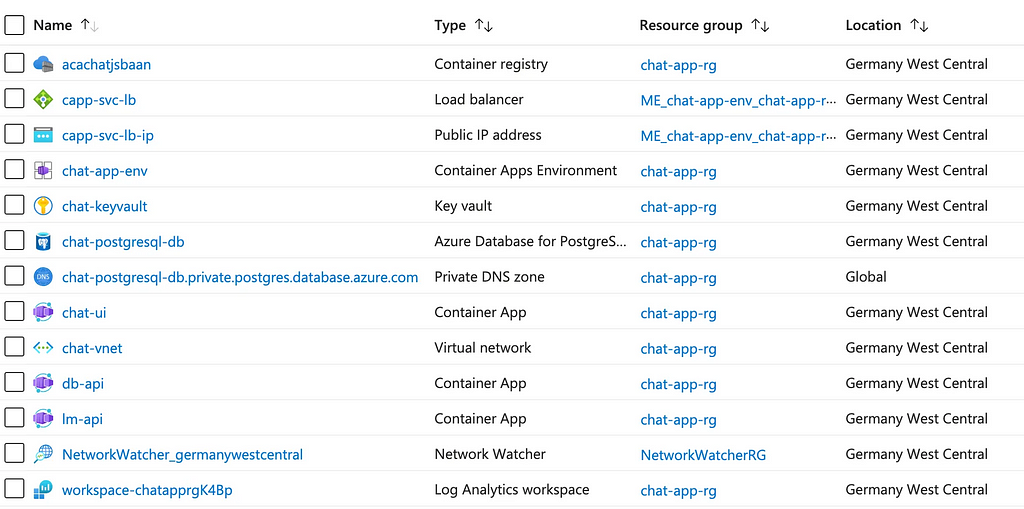
Now that the app is deployed, let’s look at an overview of all the Azure resources it app uses. We created most of them ourselves, but Azure also automatically created a Load balancer, Public IP, Private DNS Zone, Network Watcher and Log Analytics workspace.

Some resources are free, others are free up to a certain time or compute budget, which is part of the reason I chose them. The following resources incur the highest costs:
- Load Balancer (standard Tier): free for 1 month, then $18/month.
- Container Registry (standard Tier): free for 12 months, then $19/month.
- PostgreSQL Flexible Server (Burstable B1MS Compute Tier): free for 12 months, then at least $13/month.
- Container App: Free for 50 CPU hours/month or 2M requests/month, then $10/month for an App with a single replica, 0.5 vCPUs and 1GB memory. The LM API with 2vCPUs, 4GB memory costs about $50 per month for a single replica.
You can see that the costs of this small (but scalable) app can quickly add up to hundreds of dollars per month, even without a GPU server to run a stronger language model! That’s the reason why the app probably won’t be up when you’re reading this.
It also becomes clear that Azure Container Apps is more expensive then I initially thought: it requires a standard-Tier Load balancer for automatic external ingress, HTTPS and auto-scaling. We could get around this by disabling external ingress and deploying a cheaper alternative — like a VM with a custom reverse proxy, or a basic-Tier Load balancer. Still, a standard-tier Kubernetes cluster would have cost at least $150/month, so ACA can be cheaper at small scale.
5. Roadmap
Now, before we wrap up, let’s look at just a few of the many directions to improve this deployment.
Continuous Integration & Continuous Deployment. I would set up a CI/CD pipeline that runs unit and integration tests and redeploys the app upon code changes. It might be triggered by a new git commit or merged pull request. This will also make it easier to see when a service isn’t deployed properly. I would also set up monitoring and alerting to be aware of issues quickly (like a crashing Container App instance).
Lower latency: the language model server. I would load test the whole app — simulating real-world user traffic — with something like Locust or Azure Load Testing. Even without load testing, we have an obvious bottleneck: the LM server. Small and quantized as it is, it can still take up quite a while for lengthy answers, with no concurrency. For more users it would be faster and more efficient to run a GPU inference server with a batching mechanism that collects multiple generation requests in a queue — perhaps with Kafka — and runs batch inference on chunks.
With even more users, we might want several GPU-based LM servers that consume from the same queue. For GPU infrastructure I’d look into Azure Virtual Machines or something more fancy like Azure Machine Learning.
The llama.cpp inference engine is good for single-user CPU-based inference. When moving to a GPU-server, I would look into inference engines more suitable to batch inference, like vLLM or Huggingface TGI. And, obviously, a better (bigger) model for increased response quality — depending on the use case.
6. Final thoughts
I hope this project offers a glimpse of what an AI-powered web app in production may look like. I tried to balance realistic engineering with cutting about every corner to keep it simple, cheap, understandable, and limit my time and compute budget. Sadly, I cannot keep the app live for long since it would quickly cost hundreds of dollars per month. If someone can help with Azure credits to keep the app running, let me know!
Some closing thoughts about using managed services: Although Azure Container Apps abstracts away some of the Kubernetes complexity, it’s still extremely useful to have an understanding of the lower-level Kubernetes concepts. The automatically created invisible infrastructure like Public IPs, Load balancers and ingress controllers add unforeseen costs and make it difficult to understand what’s going on. Also, ACA documentation is limited compared to Kubernetes. However, if you know what you’re doing, you can set something up very quickly.
Acknowledgements
I heavily relied on the Azure docs, and the ACA docs in particular. Thanks to Dennis Ulmer for proofreading and Lucas de Haas for useful discussion.
AI usage
I experimented a bit more with AI tools compared to part 1. I used Pycharm’s CoPilot plugin for code completion and had quite some back-and-forth with ChatGPT to learn about the Azure or Kubernetes ecosystem, and to spar about bugs. I double-checked everything in the docs and most of the information was solid. Like part 1, I did not use AI to write this post, though I did use ChatGPT to paraphrase some bad-running sentences.
Designing, Building & Deploying an AI Chat App from Scratch (Part 2) was originally published in Towards Data Science on Medium, where people are continuing the conversation by highlighting and responding to this story.
from AI in Towards Data Science on Medium https://ift.tt/B0wgRFG
via IFTTT


